We hope you love the products we recommend! Just so you know, Trendy Mami may collect a share of sales or other compensations from the links on this page.
–
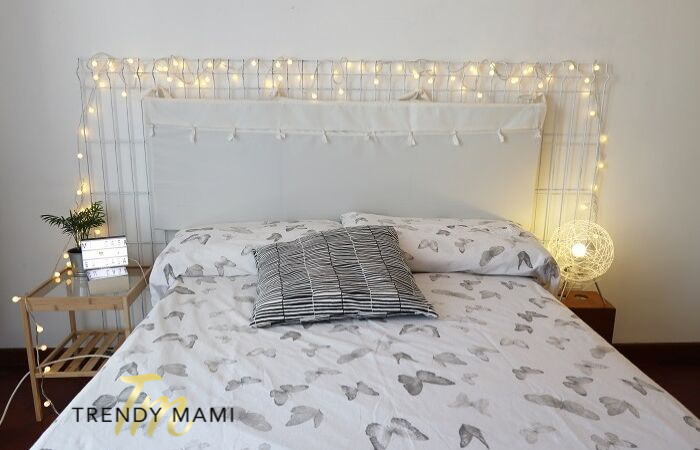
If you’re redecorating your bedroom and thinking of getting a new headboard, the thing about a headboard is that it’s not free. And what’s the point of a headboard exactly, besides making your bed look like it’s supposed to be there? (Very little). Even the non-crafty might decide to go with a DIY headboard for the simple fact that it will be more cost-effective than buying a new one. Fortunately, for everyone considering a DIY headboard, we have a fairly simple and fairly cheap DIY headboard tutorial to follow.
DIY Headboard:
What You’ll Need:
Total Cost of Materials: $72
- Garden Railing: $29.98
- Spray Paint: $3.99 (bought 3 bottles of 12oz each)
- Padding:$15.95 (You will need 15.5 inch X 46.5 inch)
- Bed Sheet (100% cotton, or non-elastic): $19.99
- Hook (optional): $7.59
- Sewing Kit (scissors, thread, needle) or (sowing machine, for faster sowing)
- Twine
Extra: Use an iron to keep the fabric in shape to ease the sewing.
What To Do:
- Take the bedsheet and spread it out.
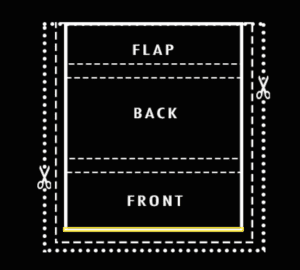
- Unless you have the right tools, drawing straight lines on a fabric is not a simple thing. So instead I placed the padding (I used three 40cm X 40cm padding squares) and flipped it along the sheet to measure how much fabric I needed and to draw guidelines.
- I took advantage of the pre-sewn hem and used it as front flap.
- After drawing the guidelines, I cut the sheet and ironed it.
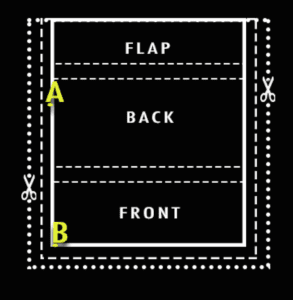
- I folded it in half (vertically) and sewed along the guideline using the basting stitch technique to have precise lines to work on, then ironed along the guidelines (video 00:35).
- The first part I sewed was the front hem using the running stitch technique.
- Once the lines and the merging points were marked (A+B), I folded the sheet (horizontally), leaving the right side of the fabric inside and sewed using the backstitch technique (video 01:52).
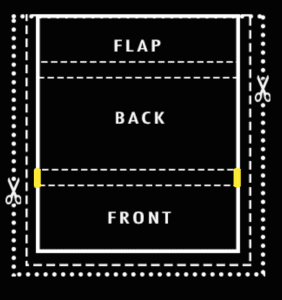
- After that I reversed the covering (inside out) and filled with the padding, this way it was easier to sew the bottom of the sides, using the blanket stitch technique (video 03:18).
- Now both sides of the covering are done, but the cuts are visible and you want to clean it up. What I did was folded toward the middle one time and ironed it to keep it in place, then folded it again and sewed using the backstitch technique (video 04:03).
- Now the body of the covering is done and we need to find a way to close the flap on the front and add laces and eyelets to hold the padding on the garden railing (video 06:36).
Don’t forget we have a video to help you along the way!
- Since I wanted to save money on the headboard buttons, I’ve created 10 buttons from the leftover fabric of the bedsheet, by cutting along the weft and ripping the fabric (it will naturally go straight if you use the same strength on both sides, left and right).
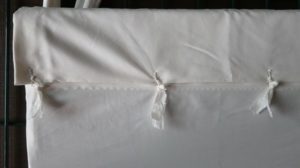
- To create the buttons, I’ve tied 4 times the knot on the same point, turning it into a 0-2 inches ball. I repeated the steps 10 times to create 10 buttons.
- For the loop, I used the twine and tied a knot. The size of the loop should not be bigger than the button ball. Repeat the steps to have 10 loops.
- To make the laces, I ripped another stripe from the fabric, like I did for the button, only this time wider, then cut into 4 pieces (video 07:33).
- I folded it in half (vertically, leaving the wrong side out). Then I ironed it and proceeded to sew using the backstitch technique.
- Once the sewing was complete, I used a safety pin to hold one end. Then, pushed it inside to reverse the lace then I closed the ends using the blanket stitch technique. I repeated the steps for all the laces.
- For the eyelets the steps are the same as the laces, only the width and the length of each stripe is much smaller, the only additional step was to fold it into a ring and sew the ends (video 09:56).
- To place it on the covering I used the stem stitch technique on the loop and the button (video 11:04), after marking the spot with a pencil.

- For the eyelet on the back I used the backstitch technique (video 12:24).
- Once the pillow of the headboard was done, I then spray painted the garden railing white.

DIY Headboard Notes To Consider:
- Make sure to wear a mask and cover the area when spray painting, because the paint dust will fall and spread in the area. I didn’t cover the whole floor and I got a thin layer of paint on the floor.
- The size of the garden railing was perfect to be placed behind the bed without needing to be held with some nails on the wall.
I hope you enjoyed reading this article and give my DIY headboard tutorial a go! And if you’re looking for another fun sewing DIY we have the awesome Felt Food for Kids DIY and even a Pregnancy Pillow and Baby Lounger DIY that would go great with your bed theme!