We hope you love the products we recommend! Just so you know, Trendy Mami may collect a share of sales or other compensations from the links on this page.
–
Calling all crochet enthusiasts, novice and experienced alike!
Embark on your next creative endeavor with these captivating crochet flower patterns. Not only will these beautiful flowers add a touch of vibrant charm to your home decor, but it also allows you to indulge in the soothing practice of your favorite hobby.
This free crochet flower pattern will walk you through everything, from getting your supplies to making each flower to putting together a beautiful bouquet.
To make learning even easier, we’ve included a video tutorial, so you can follow along step-by-step. Unleash your inner artist! Gather your yarn and hook – it’s time to embark on this delightful project together!
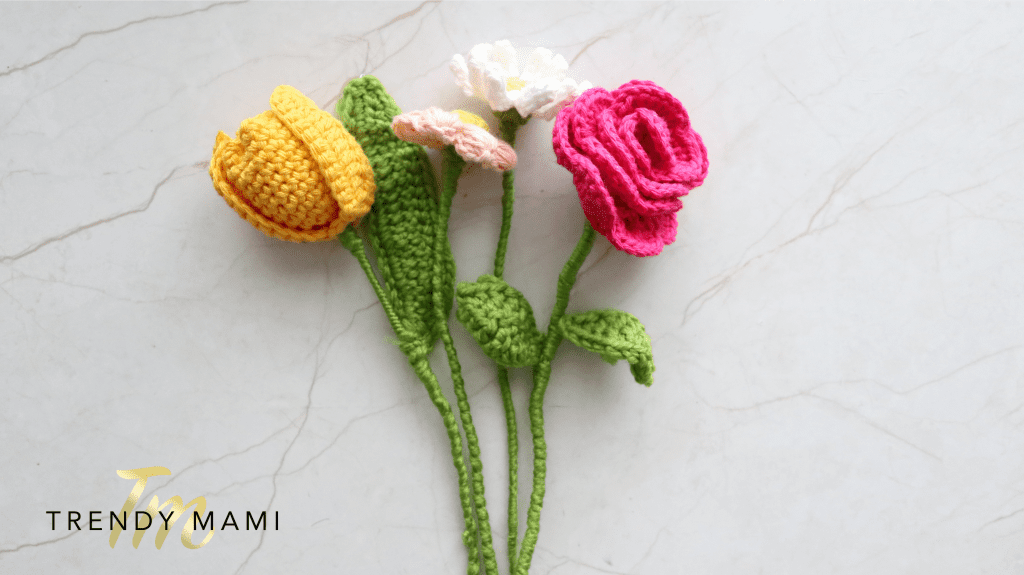
How to Make a Crochet Flower Bouquet
First, Gather Your Materials
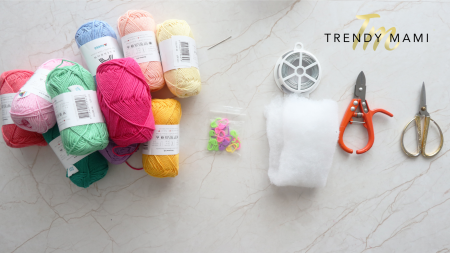
First, gather the materials you’ll need to complete this crochet bouquet project. You’ll need:
- Thin, bendable but sturdy craft wire (this stem wire is another great option)
- Wire cutters
- Scissors
- 3mm crochet hook
- Yarn needle
- A variety of cotton yarn colors. Make sure it is weight yarn for a 3m hook, we recommend yellow, white, red or pink, purple, and green. To change up the flower colors for your crochet flower bouquet you can use scrap yarn you already have to hand, or to better match your decor, feel free!
JOANN Stores offer all the materials you’ll need for this project!
Enhance your crochet flower bouquet with Lion Brand Yarn, adding vibrancy and texture to your creations. Choose from an array of colors and textures, elevating your DIY floral arrangements to new heights of creativity and sophistication.
ACRONYMS:
ch= chain
sl st = slip stitch
inv st= invisible stitch
sc = single crochet stitch
hdc= half double crochet
dc = double crochet
trc= triple crochet
Puff st = puff stitch
#1 Rose
Here is the crochet rose pattern to make a rose to add to your crochet flower bouquet:
Start with a chain of 66, this will be your foundation chain
Row #1:
- Skip the first five chains, then dc on the sixth chain to start your row.
- now skip 2 chains, and dc on the following stitch.
- chain 3, and dc on the same stitch (the result will take a V-like shape).
- Skip 2 chains and dc on the following stitch, chain 3 and dc on the same stitch.
- Repeat through out the length of the chain
- At the end of the row, chain 3 and turn.
Row # 2:
- Make 5 dc on the bridge,
- then 1 single-crochet on the gap between the bridges.
- Now make 6 dc on the following bridge + 1 single-crochet on the gap
- Now for the next bridges up to the 4th last included, dc 8 times and sc once on the gap, while for the remaining 3 bridges dc 10 times and 1 sc on each remaining gap
- now, roll it around then thread the layers together into a rose.
Leaf:
- For the leaf, start with a slip knot, then chain 10
- Flip the work and on the 2nd chain from the hook, single-crochet.
- Now, 1 hdc, 1 dc, 2 trc, 2 dc, 1 hdc, sl st, ch 1.
- Turn your work and repeat the pattern backward starting with a sc instead of a sl st, then like before: 1 hdc, 1 dc, 2 trc,1 dc, 1 hdc and sl st.
Rose Stem:
- For the stem, cut 17 inches (43 cm) of wire and fold in half.
- Insert the wire under and through the flower bottom and repeat with the yarn.
- then wrap the yarn around the stem going downward and upward again, connecting the leaf halfway through and tie everything together.
#2 Daisy
Here are the directions to make a daisy flower to add to your crochet flower bouquet:
Daisy Disk Flower:
- With a yellow yarn, start with a magic ring, insert the hook inside the loop, and pull up the yarn. Now, with a loop on your hook, yarn over, and pull through to chain 1.
- Now, sc 8 times around the magic rin
- Then pull the end of the yarn to tighten the ring, and sl st to close the round.
Daisy Ray Flower:
- Start with magic ring, ch 1 and sc 10 times, then pull the end and sl st.
- Now, ch 6, skip the first stitch and insert the hook to the following stitch, yarn over, and pull up a loop.
- We’re going to use the Tunisian method, so keep the loop on the hook and repeat the process 6 more times.
- Now, insert the hook through the stitch on the ring, and pull up another loop,for a total of 7 loops on the hook.
- To close the stitches, yarn over the hook and pull through 2 loops at a time.
- Repeat till you reach the last 2 loops on the hook: this time, instead of pulling through 2 loops, yarn over the hook then pull through the last 3 loops.
- Now, insert the hook on the first closed loop to the left and s st. Repeat 3 more times for a total of 4 slip stitches.
- Now, for the last sl st, insert the hook on the same stitch on the ring to close the petal (each petal will take 1 stitch from the foundation ring).
- Repeat the process 9 more times and you have your ray flower.
Daisy Sepal:
- To create the sepal of the daisy, start with magic ring
- Now, sc 6 times around the magic ring, then pull the end of the yarn and tighten.
- Sl st to close the round and attach it to the daisy ray flower.
Daisy Stem:
- For the stem, cut 17 inches (43 cm) of wire and fold in half.
- Insert the wire under and through the flower bottom and repeat with the yarn.
- then wrap the yarn around the stem going downward and upward again to tie everything together.
#3 3D tulip
Here are the directions to make a simple flower tulip to add to your crochet flower bouquet:
Round #1:
- start with a magic ring, ch 1, and 6 sc, tighten the end, sl st and close round 1.
Round #2:
- Chain 1, before increasing on each stitch. To increase make 2 sc on the same stitch of the foundation ring. (The total stitch count should be 12.).
Round #3:
- alternate between single-crochet + increase, (total of 18 stitches)
- At the end of the round close with a slip stitch then make an invisible stitch: to do that, chain 1, iInsert the hook under the stitch, grap the loop, and pull through, then chain 1 to start round 4.
Round #4 to #11:
- sc on each stitch then close the round with a slip stitch and an invisible stitch to start the following round.
Please note that the last flower won’t require the invisible stitch; simply use a slip stitch for finishing.
Tulip Petals:
- To make the additional petals, start with a magic ring, ch 1, make 8 sc, tighten the foundation ring, and sl st,
- then chain of 13, skip the first chain and sc the rest.
- Turn, then sc on the 2nd stitch from the hook, 1 hdc, 7 dc, 1 hdc and 2 sc
- Turn your work, then skip the first 2 stitches and 2 sc, 1 hdc, 7 dc, 1 hdc and 1 sl st.
- Turn again, and single-crochet the entire row
- Cut the yarn and duplicate a petal on the opposite side of the ring.
Tulip Leaf:
- For the leaf, start with a slip knot, then ch 25.
- Cut a piece of wire and layer it to the side of the foundation chain.
- Skip the 1st stitch and 1 sc, then 2 hdc, 3 dc, 12 trc, 3 dc, 2 hdc, 1 sc and turn.
- To complete the finishing round, sc 24 times.
Tulip Assemble:
To combine everything together, cut a 12 inches wire, fold in half, and add the filling to the tulip.
- Sew the top of the flower in a cross fashion
- Now, add the petals underneath
- Clean out the loose ends by threading them in.
#4 Puffed Flower
Here are the directions to make a puffed flower to add to your crochet flower bouquet:
Ray Flower:
- To create the puffed flower, start with a magic ring, then ch 1, and make 12 sc, to create the foundation ring.
- Sl st, then make chain of 3 to start the puff stitch,
- Yarn over, insert the hook on the first stitch on the ring, and pull up a loop 4 times.
- Then, insert the hook on the following stitch and pull up a loop 4 more times.
- With 8 loops on the hook, yarn over the hook and pull all the way through.
- Now, single-crochet to close
- Then chain 2, to start a new petal.
- Keep in mind that each petal will cover 2 stitches of the foundation ring. So you will end up with a total of 6 petals.
Disk Flower:
- To create the disk flower, ch 1 and tighten
- Chain 1 and keep it loose
- Chain 1 and tighten again then yarn over the hook
- Now, insert the hook on the second chain and build the puffed stitch in.
- pull up a loop 8-10 times, then single crochet to close everything.
- Attach the disk to the ray flower then wire the flower and wrap the green yarn around to finish.
Flower Stem:
- For the stem, cut 17 inches (43 cm) of wire and fold in half.
- Insert the wire under and through the flower bottom and repeat with the yarn.
- then wrap the yarn around the stem going downward and upward again to tie everything together.
Voila! A Crochet Flower Bouquet
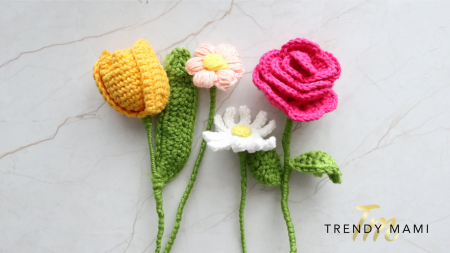
Crafted from yarn, these simple crochet flowers offer a charming and enduring alternative to their fresh counterparts, gracing your vases with a touch of handmade beauty. The true allure lies in their versatility: once you’ve mastered the individual blooms, you can create an abundance, selecting colors that resonate with your personal taste, complement your existing decor, or evoke the changing seasons.
Furthermore, mastering this beginner friendly pattern for crochet flowers equips you with a sought-after skills for more difficult projects. You can even embark on crafting breathtaking wedding bouquet arrangements, leaving a lasting impression on your loved ones.
And if this delightful crochet bouquet has ignited your creative spark, we have a plethora of other captivating crochet projects here waiting to be explored! Delve into our comprehensive collection of crochet projects, where you’ll discover a treasure trove of inspiration. A few of our recommendations, guaranteed to spark joy, include the Tutorial for a Cute and Easy Crochet Summer Top, How to Make a Crochet Tote Bag, and DIY Crochet Octopuses.