We hope you love the products we recommend! Just so you know, Trendy Mami may collect a share of sales or other compensations from the links on this page.
–
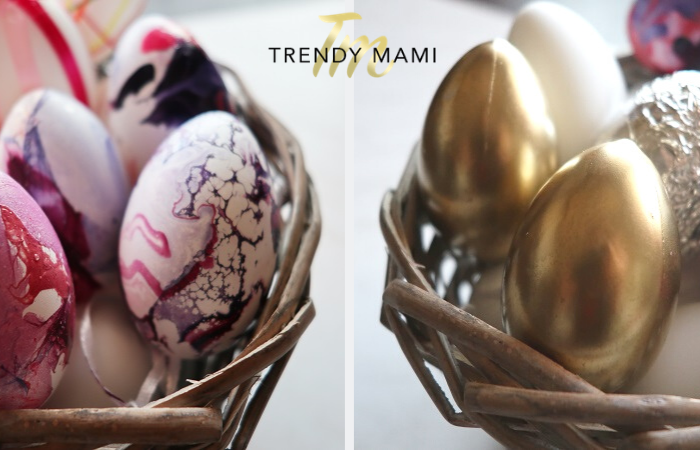
Easter is nearly among us, and you know what that means… lots of chocolate, family time and ‘eggcellent’ activities. From Easter egg hunts, opening Easter baskets, decorating an egg tree, egg painting and dyeing, you have an endless supply of fun, family-friendly Easter egg activities to choose from. We’re going to run you through some different Easter egg designs this year. Let’s get cracking!
Easter Egg Design Ideas
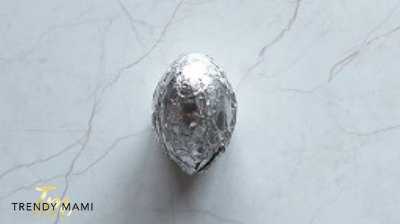
1. Silver Easter Eggs
Materials:
- Plastic eggs
- Tinfoil
- Scissors
A great place to get arts and crafts supplies is Joann’s. They always have coupons and a huge selection as well.
Steps:
- Take a plastic egg and wrap it up in tin foil
- Cutaway the excess tin foil and voila!
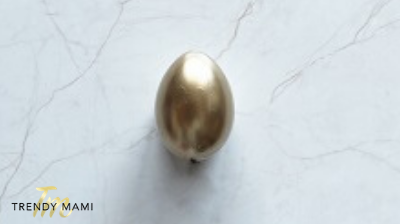
2. Golden Egg
Materials:
- Paper or old towel
- Plastic eggs
- Gold spray paint
- Gloves (optional)
- Drying rack
Steps:
- Place an old towel or paper down on your surface (to ensure the spray paint doesn’t stain anything but our egg).
- Put on a pair of gloves if you wish and you’re ready to go!
- Take your egg and spray it with the Gold spray paint ensuring every inch is covered.
- Place it on a drying rack.
- to dry and you’ll be left with a gorgeous golden egg!
3. Scribbled Easter Egg
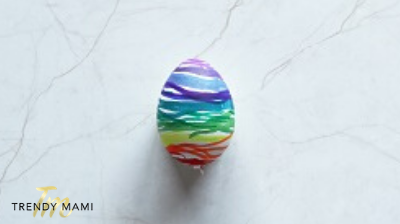
Materials:
- Plastic eggs
- Colored markers
Steps:
- Give them some different colored markers and plastic eggs.
- and let them get creative! You can also use regular colored pens, kids are already familiar with them and they’ll be cheaper and easily accessible. No need to draw straight lines with these bad boys, the overall effect will still look brilliant and festive!
4. Bow Tie Egg

Materials:
- Plastic eggs
- Ribbon
- Hot glue gun
- Scissors
Steps:
- For this design, take your egg and hot glue gun.
- Then, shoot a little hot glue on one side of the egg.
- Take your colored ribbon and wrap it around the glued section.
- Shoot the other side with a little hot glue and finish wrapping your ribbon around the egg.
- Tie a knot out of the ribbon to connect both sides around the egg, finishing it off with a bow.
- Taking your scissors, cut the excess ribbon away. There you have it, a pretty ribbon egg!
5. Pollack Egg
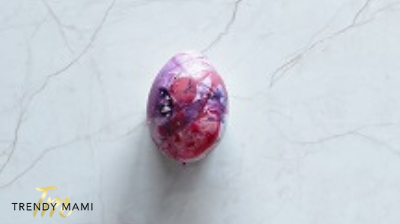
Materials:
- Nail polish
- Plastic eggs
- Bowl
- Water
- Skewer stick or nail pen
- Gloves (optional)
Steps:
- For this artsy nail paint egg, fill a bowl with room temperature water (make sure it is deep enough so the egg can fully soak underwater).
- Take your colored nail polish and drop a few drops into the water. Use as many colors as your heart desires, the more the merrier!
- With the help of a nail pen or a skewer stick, twist and manipulate the nail polish into a design you prefer. Keep in mind that the first color is the one that is going to be the most visible on the egg.
- Put some gloves on, take your plastic egg and get dipping! Emerge your egg under the water, making sure to twist the egg so the nail polish covers the entirety of your egg.
- Take it out of the water and voila! You have a creative and festive nail paint egg!
We hope you enjoyed this article on different Easter egg designs this year!
Looking for some more festive and family-friendly Easter activities? Learn how to create your very own Easter egg hunt at home here! Need help with your Easter egg hunt items? We can help you out there, click here!