We hope you love the products we recommend! Just so you know, Trendy Mami may collect a share of sales or other compensations from the links on this page.
–
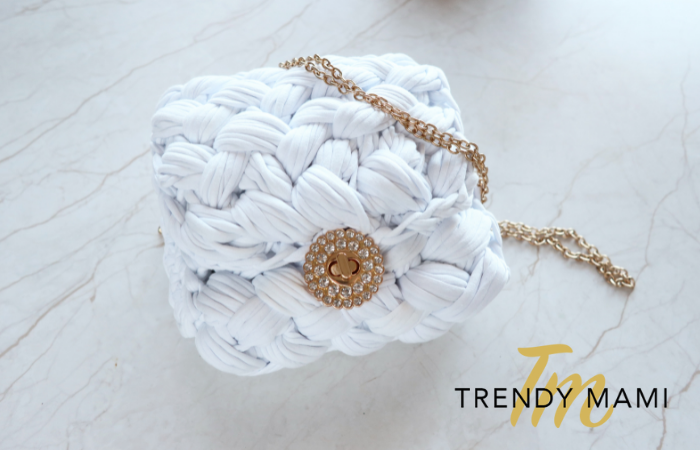
Spring and Summer fashion trends are heading our way, and finding the perfect bag for all your outfits is on the top of our list. Luckily, this DIY crochet bag is exactly the kind of accessory that’s perfectly paired with a spring dress or summer shorts!
Before you start off with your DIY, make sure you have the required good quality of fabric for you DIY stuff, check Online Fabric Store for any sort of fabric you need, thousands of fabrics for your project, from appearl to decor & much more!
DIY Crochet Bag for Spring and Summer Fashion
Below, we have an easy DIY tutorial for this cute bag, as well as a video for you to follow along with! It takes very few materials, and we’re sure that you’ll pick up the design quickly and easily!
Materials Needed:
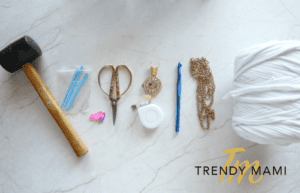
- Hammer
- Yarn needles
- Stitch markers
- Scissors
- Accessories to close the bag
- Measurement tape
- 9 or 10 mm Crochet hook
- Chain
- Tshirt yarn
The Foundation
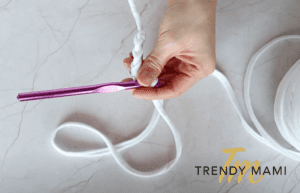
Start by creating a chain of 29. The length of the chain will determine the size of the bag in height so the longer the chain, the taller the bag will be.
Next, you’ll skip 2 chains and insert your hook into the 3rd chain. Then, create a single crochet, then chain the next one.
To do so, insert the hook, yarn over, pull through.
Yarn over and pull through again.
Skip one chain and again single crochet followed by chain one.
Skip one chain again and repeat to the end of the chain.
Then chain one.
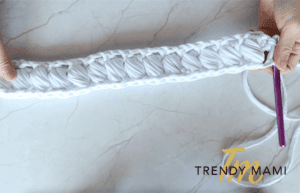
At the end of this sequence, this is how it should look like:
Row one
Turn your work, then insert the hook into the skipped chain from the previous row and single crochet.
Then insert the hook again into the same hole 4 more times to create a shell stitch.
Yarn over. Pull through.
Again.
Yarn over. Pull through
Then pull through, again.
Normally, to finish the shell stitch you’d continue by stitching one, but since we want to recreate the web we’re going to continue repeating the same stitching technique onto the following skipped chain:
So, single stitch on the next skipped chain then insert in the previous chain (not the skipped one) and repeat the “shell” stitch.
The Width
Start row two by turning your work.
Insert the hook into the hole and single crochet. You will notice on the side a long stitch like this:
Insert the hook in it and repeat the “shell” stitch.
Now follow with another single crochet on the following hole. Then insert the hook into the point diagonally from the stitch created and “shell” stitch. Now move onto the next stitch
Single crochet. And repeat till you complete the row
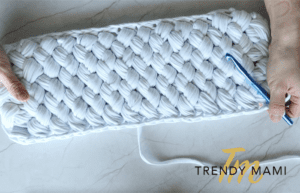
To recreate the width of our bag make a total of 8 rows, or more if you want it wider. This is how should look like at this point:
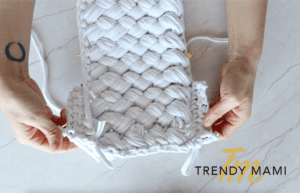
Now, You need to clean up the edge:
Chain one, then insert the hook in the loop and slipknot. Find another loop to insert the hook and continue until you reach the end of the side you’re working on.
To reach the opposite side we slip stitched through the long side but you can seal with a knot cut the yarn and start over on the other side
Once you’re done, it should look like this:
Side of Bag
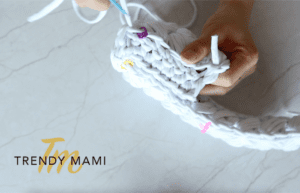
Now, you can move on to the sides of the bag. Measure how you want the final shape to be, then add the stitch markers from JOANN.
Take the yarn and insert the hook, then pull the yarn through chain one, tie a knot to hold the yarn in place.
Chain two.
Insert the hook into the back loop then single crochet till you reach the marker.
Chain one and then turn the work, repeat the single crochet to the end of the row
Depending on the depth of your bag you can continue with more rows, but for us, this is enough!
Finishing Touches
Now that we’ve hit the last part, take your yarn needle and sew the sides to seal the bag. Repeat this action on the other side, and you’re almost done!
Now clean up the loose ends and tie them on the inside, nice and clean.
Last but not least, take the bag lock of your choice, you can go with a clip lock or buttons for a minimal look. You can also go extra with a sparkling twist-lock as we did.
Now seal everything together, then take the other part of the lock and pull in a piece of yarn about 20 cm.
Seal it with the hammer, then sew the ends on the front side of the bag.
Now, grab the chain and hook it to the side of the bag.
More Spring Fashion
And there you have it! A cute, trendy crochet bag ready to be paired with a cute spring or summer dress, like these adorable, fashion-forward dresses from Anthropologie!
We hope you find this tutorial easy to follow, and that your final product brings you joy! If DIYs are your jam, we have a number of easy-to-follow samples from crochet toys to DIY beauty products! Happy crocheting!