We hope you love the products we recommend! Just so you know, Trendy Mami may collect a share of sales or other compensations from the links on this page.
–
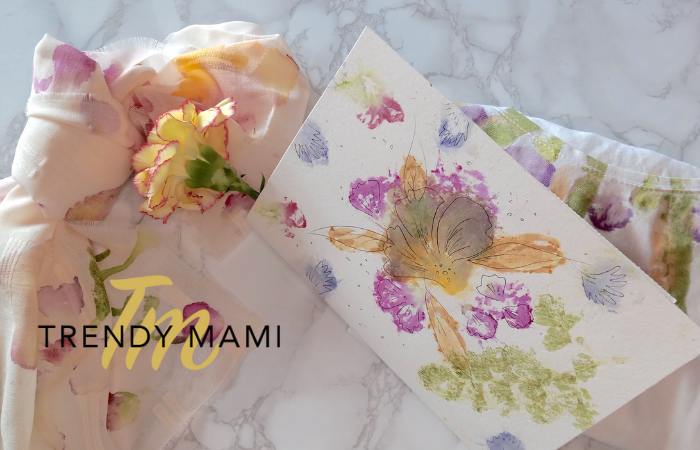
Moms love handcrafted gifts – which is why we know she’ll love this flower pounding tutorial. Because flowers have a natural dye, you can create colorful art by pounding them onto fabric or paper.
To make flower-pounding art, all you need are a few tools and a handful of fresh flowers. You can pick them from the garden or buy them from a supermarket. Feel free to get creative and to play around with your designs (we know mom will love whatever you end up making!).
Flower Pounding Tutorials
In this video, we’ll show you how to make two different styles of flower pounding art. Our first project is a greeting card that you can send to your mom. The second tutorial is a shirt with a colorful flower design.
Materials:
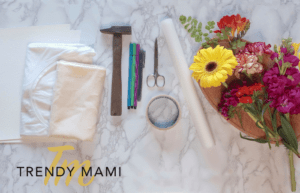
- Watercolor Paper from Target
- A white cotton t-shirt
- A Hammer from JOANN
- Markers
- Scissors
- Paper Tape
- Baking Paper
- Woodworking surface
- A bunch of fresh flowers (Bright colors transfer the best – look for Petunia, Marigold, Roses, Pansies, etc.)
Flower Card:
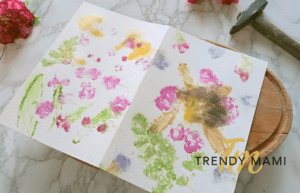
- Take a piece of Watercolor Paper and fold it in half like a card.
- Create a design for the front and back of your card. You can pluck a few different petals from the flowers and arrange them on the paper before hammering. You can also use whole flowers, as long as you remove the pollen and stem.
*We recommend testing the flowers beforehand to see how the color and pattern turn out*
- Once you have laid out your design, cover the card with a sheet of baking paper.
- Take your hammer and gently pound the petals under the baking paper. Start by hammering the outside of the petal and then working your way towards the middle. You should see the color bleeding onto the baking paper when you lift it up.
- Remove the baking paper when you’re finished pounding.
- If you’d like the color to be stronger, rub the petals with your hand onto the card.
- Greenery also looks great on the cards. You can also pound leaves for a more varied design.
- Let your card dry completely.
- To spruce up the design, take colored markers to add different patterns and lines around your pounded flowers.
- Now, write a message on the inside of the card.
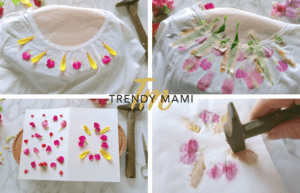
T-Shirt:

- This T-shirt flower pounding tutorial is very similar to making the card. Start by laying out a piece of baking paper over your woodworking surface.
- Now, slide the woodworking surface and baking paper inside the T-shirt.
- Arrange petals, whole flowers, and leaves on top of the shirt.
- Once you’re happy with the design, secure each petal to the shirt using a piece of tape.
- Start hammering the flowers.
- Once you’re finished, remove the tape and let your flowering-pounding art dry!
How to set the flower print
Flower dye isn’t permanent. After being exposed to air, you might notice that the colors change or lighten up. It’s also important to keep in mind that washing the clothing can cause the colors to bleed or fade away completely. For this reason, we don’t recommend washing the clothes in a washing machine.
If you do want to create a permanent design for your article of clothing, you can always use iron-on transfers. After creating your flower pounding design, you can scan or photocopy your art onto iron-on paper. The results are very similar, except they are not permanent and 100% washable.
More Mother’s Day Ideas
This flowering pounding tutorial isn’t just limited to cardstock or T-shirts. You can also pound flowers on other items of clothing, such as socks or scarves. You can also try this technique on wrapping paper or gift tags! While nothing can compete with a handmade gift, you can also score points by giving her fresh flowers as well. There are so many ways to show mom you appreciate her, and these gifts are a good start!