We hope you love the products we recommend! Just so you know, Trendy Mami may collect a share of sales or other compensations from the links on this page.
–
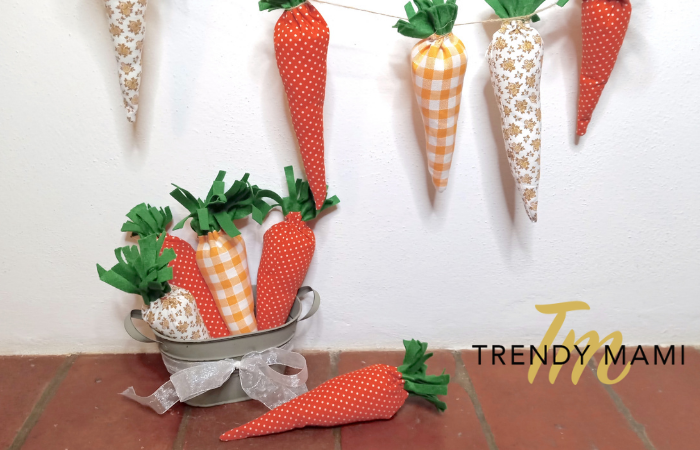
Homemade Easter decorations are cute, budget-friendly, and incredibly easy to make! For this tutorial, we will be sewing a colorful carrot garland. We will then hang each of our stuffed carrots on twine that can be used to decorate your home.
This is one of our favorite DIY Easter crafts because it can be done in just 15 or 20 minutes. Plus, it’s an eco-friendly way to reuse leftover fabric scraps you have lying around the house. And although it requires some sewing skills, it’s a very beginner-friendly project.
Easy Photo Easter Decorations
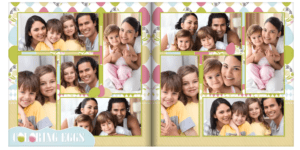
A lot of what we love about Easter is all of the beautiful decor and themes that come with the holiday. So when you’re considering how you want to decorate your home for the holiday, a beautiful canvas photo of your favorite memory with your family is a great option. You can also display an easter photobook of old family photos of past Easter holidays or beautiful spring-time pictures that fit with the time of year.
Materials for Carrot Easter Decorations:

While we’re using orange fabric, feel free to use whatever color or patterns you have. Gingham, floral, plaid, and herringbone patterns can also be used for the carrots! Just experiment and have fun making these adorable easter decorations.
- Orange printed fabrics (We have chosen three different types)
- Scissors
- Sewing kit
- Measuring tape from Target
- Twine
- Poly-fil
- Green felt
- Sewing pins
- Sewing machine
Instructions:
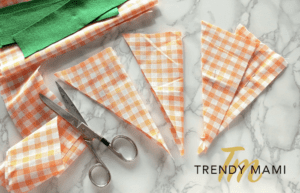
- We’re going to start by cutting “carrots” from one orange printed fabric. Take your measuring tape and measure 9 inches (23cm) wide horizontally and vertically on the material. This should create a square.
- Cut out the square.
*To save time, we recommend cutting multiple carrots at once before moving on to the next step*
- Now, fold the square in half with the fabric printed on the inside. You can fasten the two edges together with a pin to prevent them from moving.
- Take your scissors and make a diagonal cut from one corner of the fabric to the other (pin the fabric to make cutting a diagonal line easier). At this point, you should have a triangle cut from the fabric scrap.
5. Now that we have our carrot pieces, it’s time to make the greenery for our Easter decorations. Unfold your orange carrot wedge and measure the widest part (the top of your carrot).
6. Cut the green felt so that it’s the same width as the carrot top. You can make the length as long as you’d like.
7. Pin the green felt to the back of the orange fabric (the print should be on the inside).
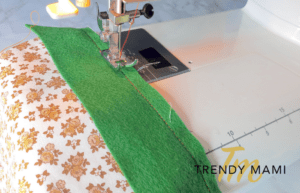
Sewing Instructions:
8. It’s time to sew our carrot! With your sewing machine, stitch the green felt to the top of the carrot. Now, stitch the sides of the carrot together, leaving a 1/3 inch piece of fabric. Once everything is sewn, you should have what looks like an inside-out carrot.
9. Continue the above steps using the different types of fabrics you have on hand.
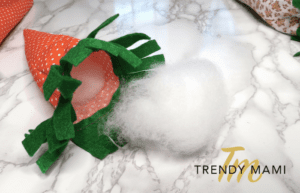
10. Once all your carrots are sewn, we can move on to stuffing them with poly-fil. Turn the carrot inside out so the pattern is now on the outside. You may need to cut the excess thread or fabric before turning this inside out.
11. Fill the inside of your carrots with the poly-fil stuffing.
12. After the carrots are stuffed, take your needle and thread to close the opening. Start by stitching the edge of the orange fabric. Once you sew the entire top, the green felt will start to pinch close.
13. Make a knot and cut the excess thread.
14. With your scissors, make small cuts on the green felt to texturize the top of the carrot.
15. Repeat will all your carrots.
16. Because we’re making Easter decorations, we’ll sew all the carrots together into a beautiful, decorative garland. Take a long piece of twine and line your carrots in alternating order.
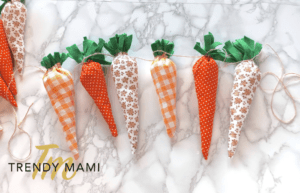
17. Tie the twine around the top of the carrot (around the green felt).
18. Repeat with each carrot until they are all hanging on the twine.
19. Find a nice spot for your new garland and hang it up for everyone to enjoy! This DIY Easter craft looks great over the fireplace, dining room table, or even around the kitchen island.
More Easter Ideas
There are so many fun Easter decorations that you can make at home. In addition to our carrot garland, we also have a few other tutorials you might like. Check out our video on different ways to paint Easter eggs for your Easter egg hunt. We also have a tutorial to make homemade chocolate eggs too! Happy Easter!