We hope you love the products we recommend! Just so you know, Trendy Mami may collect a share of sales or other compensations from the links on this page.
–
It’s true that the COVID-19 quarantine has driven people to spice up their decor, getting sick of staring at the same blank walls day in and day out. People have been wondering how to fill their blank walls and give them a little personality. Sure, it’s fun to track down wall art from different retail stores, however, we think DIY art projects to dress up your living room or bedroom walls is a lot more fun and creative.
For those of you looking for an alternative way to put your friends and family on your walls (in place of photos, that is), take a look at ArtPix. ArtPix offers the highest quality photo crystals that will surely spice up your home, especially if used in unison with your new DIY Wall Art.
It might sound kind of intimidating and scary, but we’re here to tell you that DIY artwork, such as paintings, embroidery pieces, and abstract artwork isn’t as hard to make as you think. In fact, we have 4 easy DIY wall art projects that you will be able to do in your sleep! Not to mention, DIY wall art can also be a lot easier on your wallet too.
So, instead of springing for that expensive piece you found in a catalog, you can create an oh-so-similar version for a fraction of the price, and you’ll have the satisfaction of knowing you made it yourself! Now, block off some quality alone time, maybe ask your little ones to join in on the fun, it’s time to make some easy DIY wall art projects!
Before going to make some easy DIY wall art projects quickly have a look at the stunning wall arts from Mixtiles. Mixtiles that turn your photos into amazing wall arts and are very beautiful 8″x8″ photo tiles that can stick and restick to your walls without any damage. Design beautiful walls filled with memories using your favorite photos with Mixtiles!!!
What You’ll Need:
Acrylic paints
- Red
- Black
- White
- Yellow
- Gold (optional)
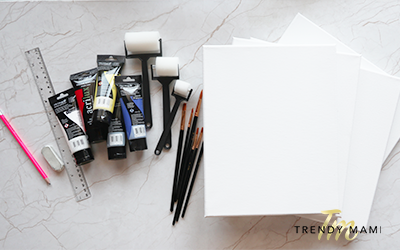
Other supplies:
- Black marker pen
- Brushes
- Foam roller
- Canvas
- Paper tape
- Pencil

What To Do:
Block Color Style
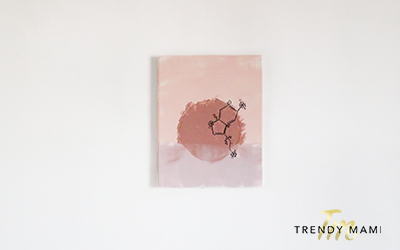 Step 1. Take your canvas and using a pencil and circular object, map out your design.
Step 2. Use paper tape to create a clean line that will break up your colors.
Step 3. Using a foam roller, take your first color and paint it on the top half of your canvas. Make sure you don’t dip below the tape.
Step 4. Let the paint dry before continuing with this step. Take a circular object like a water bottle or vase, and trace a circle in the centre of your canvas. Make sure your circle is mainly above the tape, just dipping under.
Step 5. Resketch your drawing with a pencil if you need too.
Step 6. Remove your paper tape and use your foam roller to paint your second color onto your canvas.
Step 7. Using a flat brush, take your third color and start painting in your circle. Before it dries down, take your foam roller and brush over the bottom of your painted circle.
Step 8. Take your black marker and black pen and start sketching out your design again.
Step 9. Using a flat brush, take your third color and go over the edges of your circle, cleaning it up.
Negative Space Style
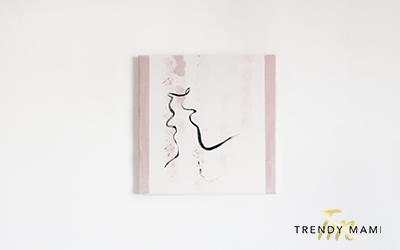 Step 1. Take your second canvas and a pencil and sketch out your design. Try to create your design with a single line, so it’s all connected.
Step 2. Take paper tape and place on the sides for your negative space.
Step 3. Take a round brush and black paint and go over your design.
Step 4. Take your foam roller and paint the sides in between the tape and the edge of your canvas, creating the negative space.
Step 5. Remove the tape from your canvas.
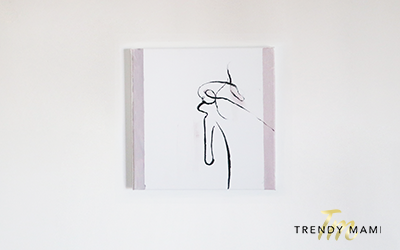
Art Graphic Style
 Step 1. Take a pencil and sketch out your design on the canvas.
Step 2. Again, take paper tape and tape off the edges of your canvas, however this time creating a fake frame.
Step 3. Take your foam roller and paint your canvas in between the tape with your first color.
Step 4. Take your flat brush and second color and start painting your design.
Step 5. Once finished painting, take paper tape and start placing over your design to create clean lines.
Step 6. Take a flat brush and your third color and start painting around the paper tape.
Step 7. Wait for your paint to dry and peel off your paper tape.
Step 8. Go over any color you’re unsatisfied with.
Step 9. Paint your shadows in your design by watering down the colors.
Step 10. Remove your tape from the sides of your canvas.
Abstract Style
 Step 1. Take a pencil and sketch out your design on the canvas.
Step 2. Take paper tape and tape off the sides of your canvas, for a negative space again.
Step 3. Take a flat brush and paint the sides of your canvas with the first color, creating your negative space.
Step 4. Take your first color with a flat brush and paint in your design too.
Step 5. Take a round brush with black paint and go over the details in your design.
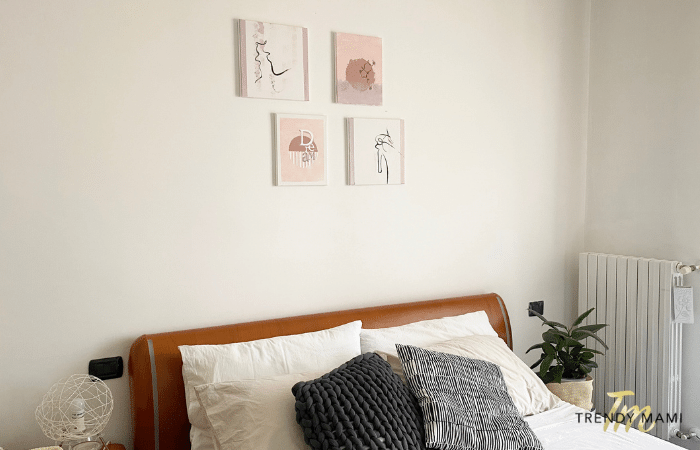
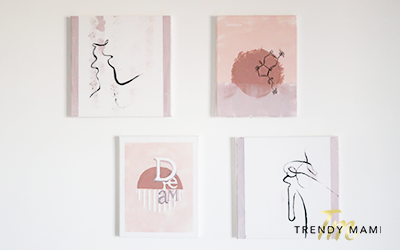
Voila! We hope you love your 4 easy DIY wall art projects. You can pick 1 easy DIY wall art painting to do, or all 4! We made sure that the color scheme of all 4 easy DIY wall art paintings matched perfectly.
If you did enjoy these easy DIY wall art projects, you may also enjoy How To Tie Dye 4 Different Ways – Tie Dye Tutorial or DIY Giant Chunky Knit Blanket – Video Tutorial Included.