We hope you love the products we recommend! Just so you know, Trendy Mami may collect a share of sales or other compensations from the links on this page.
–
No home is complete without décor that represents your style and color palette. And while they might not be the biggest statement pieces in the room, resin coasters are a great way to add a unique, personal touch to your home. Not to mention, they protect your valuable furniture from harsh water stains and potential spills. Especially these tough epoxy resin coasters!
But why spend money on coasters from a shop when you can make them right in the comfort of your living room? These resin coasters are not just easy to make, but they’re easy to personalize so that you can match them with your own personal color and style. Some goes for these macrame coasters! However, this resin coaster DIY tutorial teaches you step-by-step how to make a set of drink coasters for your home. You can also take a peek at our instructional video, so you’ll have a better idea of how to make these fun and easy epoxy resin coasters.
Resin Coaster Instructions
Materials:
- Silicone Molds
- Resin Kit
- Pigment Powder
- Glitters
- Cooling Rack
- Multipurpose Gloves
- Kitchen scale
- Wooden sticks
- Plastic cups
Preparation
- Prepare your workspace by laying out a plastic bag to protect your surfaces. This will protect against any spills or stains that could potentially damage your workspace!
- In a plastic cup, pour in equal amounts of both Resin A and Resin B. Resin A is the resin blend, while Resin B is the hardener that dries your coaster into it’s desired mold. You can use your kitchen scale to measure the weight to make sure they are both equal.
- Choose the pigment color of your choice. Add the pigment to the resin mix and stir together until all the ingredients are uniform in color, and there are no longer small bubbles in the mixture. This could take up to two minutes to thoroughly stir the mixture.
- Repeat the above steps for each pigment color you want to work with.
 Pouring
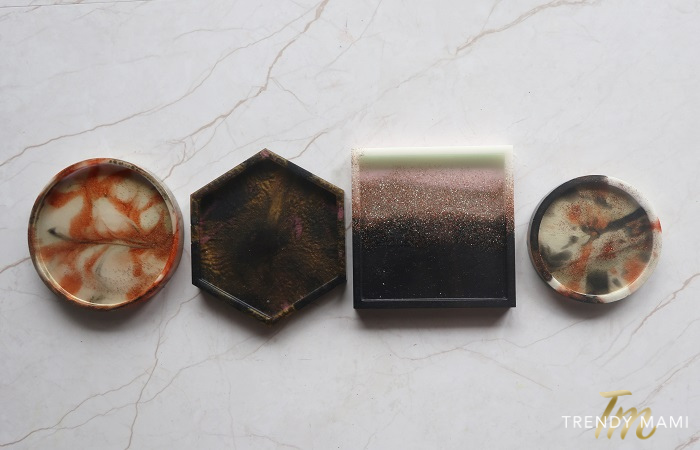
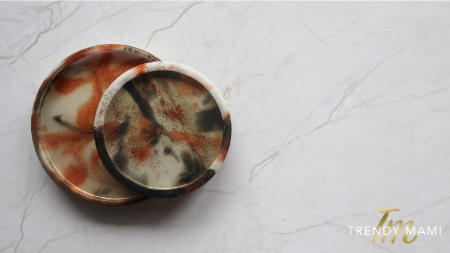
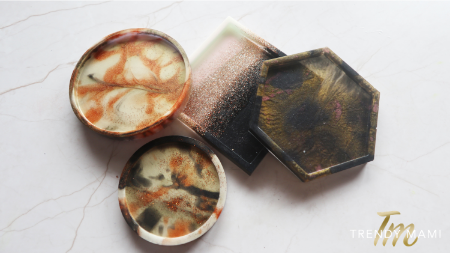
- Now comes the fun part! Place the silicone mold of the coaster onto your workspace. Choose your first pigment color and decorate the first layer or your coaster. You can get creative with and drizzle, dab, or splash the pigment for added texture. It’s important to remember that these first few pours will be shown at the top of the coaster when it’s complete.
- Feel free to add other fun textures, like glitter or even small ornaments. These small additions will add depth and uniqueness to your resin coasters.
- Once you have designed the top portion of your coast, you can add in a base color of your choosing. Think of the base color like the background to your pigment designs that you poured and added in step 1 and 2.
- After the base color is added, you can continue adding additional layers and pigments. This will eventually be the bottom layer of your coaster. You can use the same colors you poured for the top, or they can be completely different!
- If you want to mix the colors of your resin coasters together, you can use a wooden stick to push the newly added color around the mold. This will give your coaster a mixed look rather than a layered look.
- Place a cooling rack over your resin mold. Cover the cooling rack with paper or cloth, and leave the entire thing to dry overnight, or at least for 12 hours.
- Once the coasters have dried, you can pop them out of their molds. Give yourself a pat on the back and admire your beautifully created resin coasters!
Resin Coasters DIY Tips
- While you’re doing anything with liquid resin, it’s always a good idea to protect your hands and fingers. Make sure to wear a pair of rubber gloves while handling the mixture and pouring the pigments, or else you might end up with sticky resin all over your hands!
- Once you add the base color to your designs, you might notice that it smears or distorts the top color/layer that you first poured. To preserve your initial design of the top layer, we recommend just running a small amount of base color over the spot. Once that is added, you can pour the rest of the base color into the mold.
- Don’t be afraid to experiment with different color combinations, shapes, and extra textures like glitter or ornaments. When it comes to making epoxy resin coasters, there’s an endless world of artistic opportunities at your fingertips!
 Making your own resin coasters is a fun and unique way to add a touch of creativity to your household. They also make great birthday, graduation, mother’s day, or just “thinking of you” gifts. After all, who doesn’t love a handmade gift?
Once you’ve tried this resin coaster DIY, we recommend checking out our no-sew tutorial for making those macrame coasters. Your coffee table is going to get a whole new makeover once you decorate your household with these adorable DIY coasters. For more home decor DIYs check out Easy DIY Wall Art Projects – Video Tutorial Included and DIY Giant Chunky Knit Blanket – Video Tutorial Included. Also, Cratejoy always has awesome boxes to chose from with everything you need for each project!