We hope you love the products we recommend! Just so you know, Trendy Mami may collect a share of sales or other compensations from the links on this page.
–
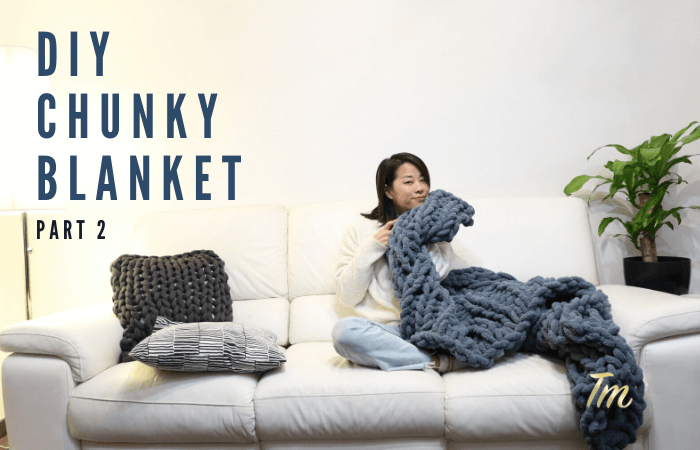
No matter the weather, there’s no denying the fact that snuggling down with a warm blanket beats running errands or going to work hands down. Add a good book, Netflix binge and/or some alcohol into the mix and you have yourself a staycation paradise. But we know of another thing to kick things up a notch—not just any warm blanket, but a giant chunky knit blanket.
However, with the usual chunky knit blanket costing on average $200, most of us kiss this blissful dream goodbye. But, what if I told you that you didn’t have to? Let’s get DIY’ing ladies! The material needed for this DIY is cheap and totally budget-friendly, your bank account will be thanking us. So, if you’re looking to save money and wanting to take your DIY craftiness to the next level, let’s get started! For this DIY, we have a helpful video tutorial to help you out.
Looking for crafting materials, check out Joann for all your crafting needs!

DIY Chunky Blanket:
Pssst, this article is part two to our DIY chunky knit blanket tutorial, part one teaching you the stitching methods you need to make your very own DIY chunky knit blanket. Check out part one here, before reading on!
What You’ll Need:
- [easyazon_link identifier=”B07GSLJN12″ locale=”US” tag=”twkmobile-20″]Chunky Yarn for Blanket[/easyazon_link]
Check out Annie’s for other DIY materials or even chunky blanket materials, they have so many colors to choose from!!
Starting Method: Chain of Stitches
For our starting method, chain of stitches, take your yarn and twist the tail yarn, reaching through the loop we just created and pulling the yarn, tying it. Then, grab the live yarn and pull it through the first loop. Repeat this step for as many stitches as you need.
Then continuing on with a stockinette stitch, grab the live yarn, pull through the stitch (loop) and lay it flat. Repeat this step and complete the first two rows.
Now pull the yarn through the stitch from back to front, then from front to back, creating a reverse stitch. Complete the row and repeat this step; the ribbing stitch! Just keep an eye on how many rows you can make with one ball of yarn.
Once you have two rows to go, it’s time to finish it up! Going back in with a stockinette stitch, grab the live yarn and pull it through the first stitch (loop) and lay it flat. Repeat this step with your other stitches (loops) until your last two rows are complete.
Make sure all of your stitch sizes are the same, from the beginning of your blanket to the end.

Closing Method: Loop on Loop
To tie off your stitches (loops), take the last loop on the end and reach your hand through, grabbing the next loop and slipping the last loop over it. Repeat this step until you have no more loops left and tie off with the remaining yarn.
We hope you enjoyed this two-part tutorial on how to make your very own DIY giant chunky knit blanket and matching cushion! Perfect for your bedroom or lounge, giving you trend and comfort all in the one. Be sure to check out our other DIY articles here!
Also, feel free to check out some of our other holiday DIYs like the Teddy Bear Warming Bag, DIY Felt Food for Kids (a great holiday gift idea), DIY Felt Ornaments for Your Tree!