We hope you love the products we recommend! Just so you know, Trendy Mami may collect a share of sales or other compensations from the links on this page.
–
If you’re anything like us, there is no slice of cheesecake that we’ll turn down. But we must admit that there really is something about Japanese cheesecake that’s truly extra special. Ever since it’s become a food trend in the States, there are dessert eateries and restaurants that have made it a feature food on their menu and we totally get why.
So, what makes Japanese cheesecake so divine? Although it contains a lot of the ingredients that traditional cheesecake has, there is a particular technique in its preparation that makes all the difference in the world. In order to end up with the fluffy “spongy” texture of this kind of cheesecake, an egg whites and sugar combo needs to be whisked separately before being added to everything else.
But we’re kinda getting a little ahead of ourselves. If you’re ready to sink your teeth into some homemade Japanese cheesecake, we’re here to walk you step-by-step through the process.
Japanese Cotton Cheesecake
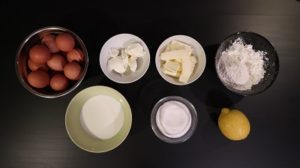
What You’ll Need:
7” Cake Pan:
- 2 oz. of milk
- 6 oz. of Philadelphia Cream Cheese
- 2 ½ tablespoons of butter
- 1 ½ oz. of flour
- 1 tablespoon of cornstarch
- 5 eggs
- 3 ½ oz. of sugar
- ½ of lemon zest
9” Cake Pan:
- 3.5 oz. of milk
- 8 oz. of Philadelphia Cream Cheese
- 4 ½ tablespoons of butter
- 3 oz. of flour
- 2 tablespoons of cornstarch
- 8 eggs
- 6 oz. of sugar
- 1 lemon zest
Step One:
To get all of this started, I put a medium-sized pot on one of my stove’s burners on low-medium heat. Then I put my butter, cream cheese and milk into the pot, stirring slowly until everything is well-blended together. Then I take it off of the burner.
Step Two:
Now it’s time to whisk the first set of eggs. First, I whisk the eggs. Next, I add the mixture from the stove in with the eggs and I whisk some more. Next, I add the lemon zest and—yep, you guessed it—I whisk some more.

Step Three:
The next thing that I do is combine my flour and cornstarch in a separate bowl, mix them together and use a sifter to slowly add them both to the bowl that contains my other ingredients. And…I whisk away some more.
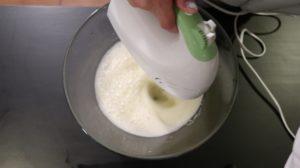
Step Four:
In an entirely different bowl, I put two egg whites in a bowl and use an automatic mixer to blend them as I very slowly add sugar into the whites (I know that I’ve done it right when the end result is a white, light and fluffy cream-like texture). By the way, it can’t be said enough that this is the part that sets Japanese cheesecake apart from the rest.
Step Five:
Next, it’s time to slowly add the egg whites and sugar to the rest of the cheesecake batter. I make sure that I only take out a portion of the fluffy cream, put it into the batter and then use my whisk to, ever so slowly, blend everything in together. I continue this process until all of the fluffy cream has been added. (Note: Be careful to not whisk past the “creamy” point. Over-whisking could prevent your cake from not rising as high as you’d like it to.) Check out video here for the texture you should have.
Step Six:
Now it’s time for the most complex part of it all. I pull out my springform pan and I cover the sides of it with aluminum foil while applying cooking paper to its bottom so that it’s twice as high as the pan itself. Then I pour all of the cheesecake batter into the pan.

Step Seven:
With my oven preset at 250 degrees, I put a long casserole dish (long and wide enough to hold the pan) onto the lowest rack of my oven. Then I pour some hot water onto the dish (enough to cover it entirely) and place a layer of cooking paper on top of it. Next, I place the springform pan on top of it all.
Step Eight:
I let the cheesecake bake for 20 minutes.
Step Nine:
Then I raise the temperature of the oven to 300 degrees and allow the cheesecake to bake for 30 minutes more.
Step Ten:
I open up the over for about 10-15 seconds.
Step Eleven:
Then I close it, set the temp to 215 degrees and allow the cheesecake to bake for (whew!) 55 more minutes.
Step Twelve:
I (very carefully) take the cheesecake out of the oven, allow it to cool for about 10 minutes and then remove the foil and cooking paper from the pan. Then I allow the cake to cool at room temperature for between 1-3 hours.
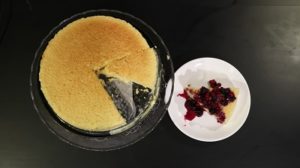
Step Thirteen:
Now my super light Japanese cheesecake is ready to slice and serve with blackberries, raspberries, strawberries, chocolate sauce or all of the above. And it’s now ready to enjoy.
Trust me, it takes a bit of work, but you’ll definitely not regret your efforts. Not one bit!
Looking for a delicious dinner to go with your dessert! Check out this Yummy Pasta Dish!