We hope you love the products we recommend! Just so you know, Trendy Mami may collect a share of sales or other compensations from the links on this page.
–
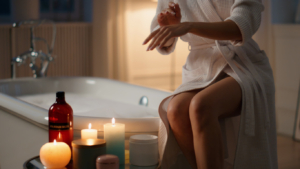
Question. When’s the last time you took a bath? We don’t mean when’s the last time you literally hopped into the shower (hopefully, that’s daily!). What we’re asking is when is the last time you ran some hot water, brought a candle into your bathroom (along with a glass of wine), poured a few drops of lavender oil, or dropped a bath bomb into your tub and soaked to your heart’s content? If you can’t recall, it’s been far too long.
Although baths are oftentimes seen as luxuries, there is scientific evidence to support that they are true necessities too. Baths improve blood circulation, calm your nervous system, open up your lungs so that you can breathe better, pull toxins out of your skin, soothe aching muscles and joints, and can even balance your hormones.
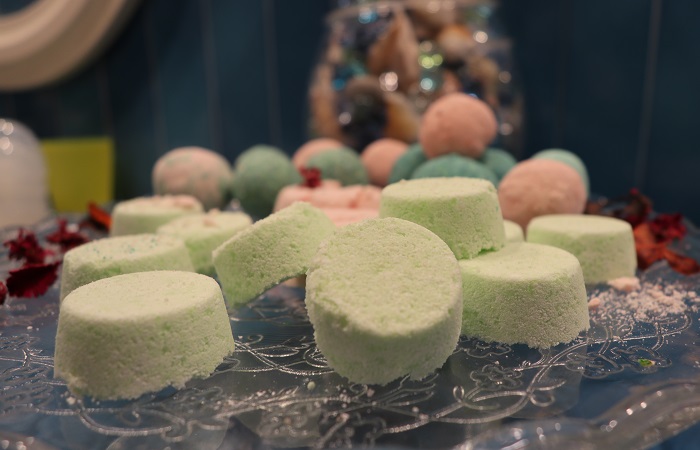
So, why not set aside some time this weekend (or even tonight) to treat yourself to a bath? While you’re at it, why not drop a homemade bath bomb or two into the water as well? It’s easy to make and even better to feel.
Quick side note for those of you looking to add to the ambiance of your entire home rather than just your bath, take a look at Horchow. For everyone else, continue reading!
DIY Bath Bomb Recipe:
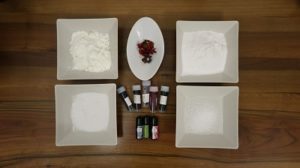
What You’ll Need:
- 1 cup of baking soda
- 3/4 cup of cornstarch
- 1/4 cup of Epsom salt or cane sugar
- 1/2 cup of citric acid
- Food coloring
- Essential oil (of your choice)
- Dried flowers (optional)
- A large bowl
- Measuring cups
- A mixing spoon
- A sifter
- A spray bottle
- Anything that can serve as a mold—silicone molds, plastic eggs, muffin tin lined with saran wrap, flower molds, etc.
Step 1: I start this off by putting all of the “dry ingredients”—baking soda, cornstarch, and Epsom salt—into my large bowl. Sometimes these kinds of things are stuck together in their original packaging, so I’ll use a sifter to break any chunks up. Then, with my whisk, I’ll mix everything together.
Step 2: Next, I take my spray bottle and add 2-3 drops of food coloring (the amount really depends on how light or dark you want your bath bombs to be), about 8-10 drops of the essential oil of my choice (lavender, jasmine, vanilla, orange, and patchouli are really nice options) and then I fill the bottle up about one-third of the way with distilled water. Then I put the spray bottle’s top on and shake it really well.
Step 3: Although it’s totally optional to use dried flowers, I like them a lot; they add to the scent of the bombs and can work as great exfoliants as well. The key is using my hands to break them up so that they end up looking like potpourri. I add them to the dry ingredients that are in my bowl and use the whisk to whirl them around too.
Step 4: I spray the dry ingredients with my bottle until everything gets damp but not too wet (if it looks watery or even like cookie batter, add a few more of the dry ingredients to everything); it should have a flaky-like consistency.
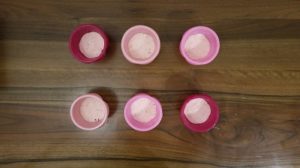
Step 5: I put the mixture into my molds. I personally prefer silicone molds but aluminum ones or plastic eggs (like the ones you’d use to make Easter baskets) work really well too. For small ones, I fill each mold around halfway and for large ones, I fill the molds up to the very top, making sure to use a spoon to press everything down firmly. Then I either let them sit overnight at room temperature or, if I’m in a rush, I’ll place them in the freezer for 30-45 minutes.
Step 6: I take each bath bomb out of the mold so that I can do the next step—wrap them!

Bath Bomb Wrapping Options:
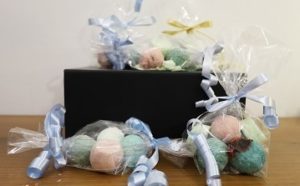
What You’ll Need:
- Cellophane bags
- Scotch tape
- Scissors
The Bonbonierre Wrapping Style:
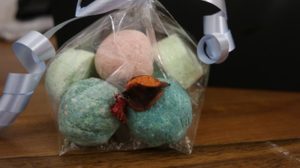
I take a cellophane bag and create a flat base on it by folding two small triangles at the bottom of it. Then I use some Scotch tape to secure them together. Next, I put as many bath bombs as I want into the bag and close the top with some curling ribbon. And I’m all done.
The Candy Wrapping Style:
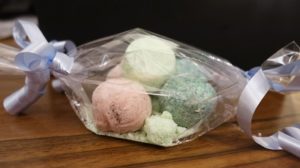
I take the closed end of a cellophane bag and, about two inches from the bottom of it, I tie some curling ribbon around it. Then I put a few bath bombs into the bag and secure the other side of the bag with some more curling ribbon. If I turn the package to its side, it looks just like a piece of candy. Very cool!
Are you excited to make your own bath bombs? We certainly hope so.
Enjoy your—much needed and much deserved—bath time!
Looking for something else relaxing? How about DIY soap! Yes, we said it, DIY Soap! Check out some of our favorite recipes!
Lastly, if you’re looking for awesome beauty products in general and not just bath products. I highly recommend Allure Beauty Box! They have a variety of high-end products that definitely meet your needs!