We hope you love the products we recommend! Just so you know, Trendy Mami may collect a share of sales or other compensations from the links on this page.
–
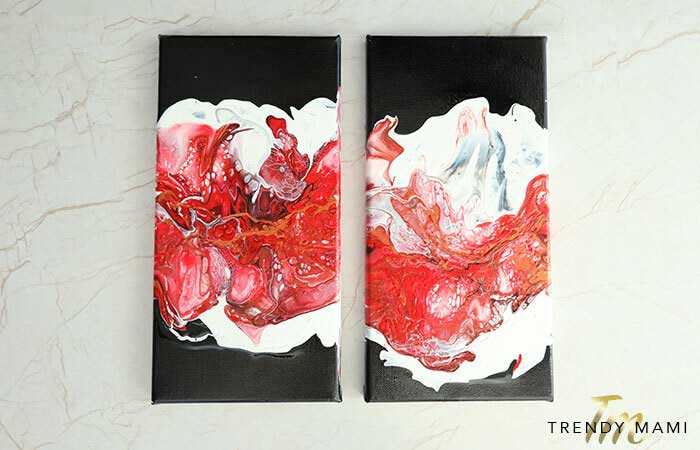
The right wall art can transform those blank walls of your house into a loving home bursting with personality. Although you can always buy decor online or from an artist, why not try your hand at creating your own colorful work of art? These fun and stylish acrylic pour paintings are guaranteed to add a bit of glitz and glam to any wall of your house, although they also make great gifts too!
If you’re looking for high-quality furniture and home decor, check out Oka. Oka features luxury and timeless furniture for your home. Check out their sales page for some great quality finds at a steal!
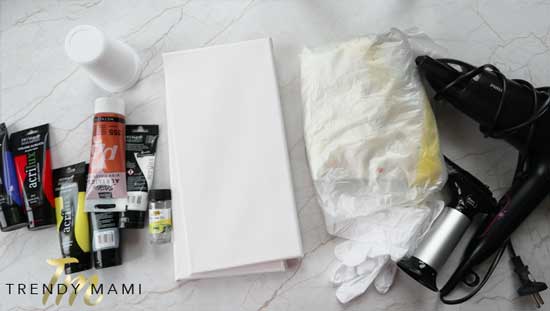
Materials:
- Acrylics (black, red, white, copper, dark blue)
- Plastic cups (one for each color)
- Popsicle sticks for stirring
- Silicone oil (optional)
- Canvas
- Torch
- Water
- Hairdryer
- Plastic bags for covering
- Rubber gloves
- Box for elevating the canvas (plastic or cardboard is fine)
Prepping for Acrylic Painting:
- Cover your working surface with a plastic bag. Acrylic pour painting can damage some surfaces, so take extra precautions to make sure your table is properly covered.
- Wrap your box in a plastic bag. We will use this to elevate our canvas when we start acrylic pouring.
- Now we will prep our acrylic colors. Pour the colored paint in one of the plastic cups, and mix with a little bit of water. Stir using the popsicle stick until the consistency is smooth and liquid. The paint should be able to drip smoothly without any breaks in the ink. If it starts beading or dripping, then you have too much water in the mixture.
*Tip* Decide on which colors will be used for your base. This will require a lot more paint than the others, so make sure you have enough paint to cover the surface of your canvas.
- You can choose to add a few drops of silicone oil to some of your colors. This will create bubbles or cells, which adds a unique look and extra dimension to your painting. We added silicone oil to our red, copper, and dark blue.
Pouring the Acrylic Painting:
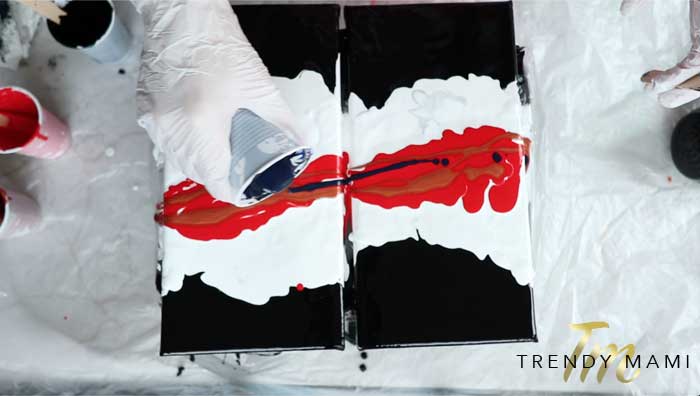
- In this video, we’ll be using two 13×15 canvas boards, however, you can use any size canvas you want! Go big with a large canvas, or start small with mini, portrait-sized boards. Place your canvases on the plastic-wrapped box.
- Start pouring with your base colors. We used black on the edges and white in the middle. We drizzled the paint in large pools on both ends of our canvas for maximum coverage. Don’t use all the base colors – we want to save some for later.
- Take your hairdryer and spread the paint over the canvas with the hot air. This also helps to get out any small bubbles that can rise from the acrylic painting.
- For our acrylic pour painting, we wanted the black and white colors to cover the corners, so we blew the paint until it was dripping off the sides. Use your rubber gloves or paper towel to clean up the drips and to cover the sides of your canvas.
- After your base colors are poured on the canvas, you can start decorating your acrylic pour painting with additional layers. We added a line of red paint and a line of copper paint across the middle section of our white base color. Then we drizzled a little bit of blue paint over the red and copper for a contrasting layer.
- At this point, add more of your base colors to the canvas to help everything blend together.
- Start by blowing the base colors with the hairdryer in one direction towards your newly poured colors (in this case, we blew the white paint over the red, copper, and blue colors.)
- Now blow the base color over the other colors in the opposite direction.
- By now, your reds, coppers, and blues should be swirled together. Feel free to use the blow dryer to play around with different techniques and patterns. Remember, no two acrylic pour paintings are the same, so don’t worry if your shapes don’t look exactly like ours!
- If you used silicone oil, you should now start to see round cell-like shapes popping up in your paint. If you have a paint torch, you can focus on certain areas of the painting to create more cells.
- After you are satisfied with the blending of the colors, let the canvases dry.
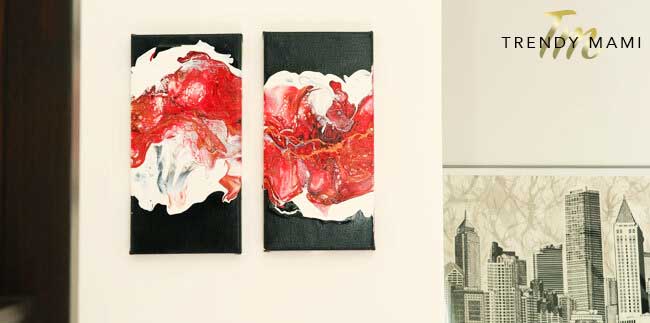
- That’s it! Now you’re ready to hang your new masterpieces anywhere in your home!
Are you ready to experiment with different colors for your acrylic pour? It’s always a good idea to decide which colors go together before you start pouring. You want to make sure that the colors look good when they start blending together.
You can also experiment with different types of silicone, such as B’laster, Liquid Wrench, and even WD40! Each one will create different textures and patterns for your painting, so feel free to try different styles to see which one you like the most!
Painting is a great stress reliever, so if you have more white walls that are in dire need of some pizazz, then check out our other DIY art tutorials, or our other DIY projects!