We hope you love the products we recommend! Just so you know, Trendy Mami may collect a share of sales or other compensations from the links on this page.
–
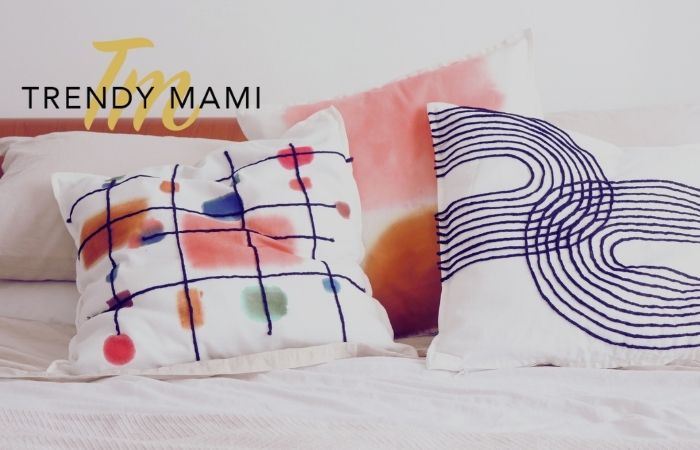
Whether they’re placed on your bed or used on your couch, learning how to sew a pillow case is a stylish way to add a bit of color and décor to your home. Plus, they’re much more affordable than expensive throw pillows that you can buy online or at a home décor shop. Today, we’re going to show you how to sew a pillow case in three different fun styles using just a few materials that you probably already have lying around your house!
Materials
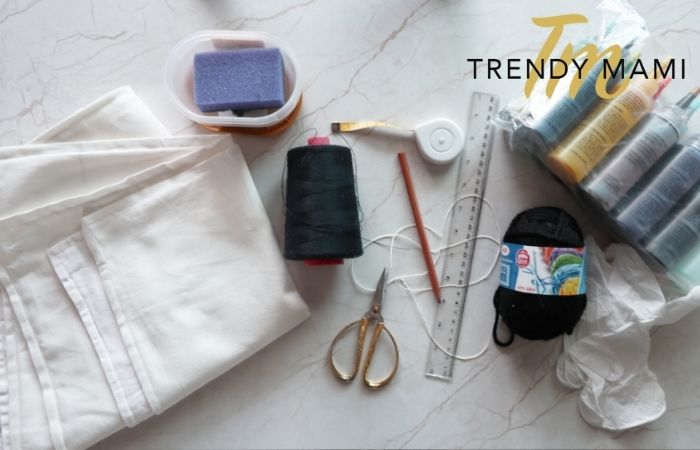
- Off-white square pillow cases (20×20 inches in size)
- Scissors
- Sewing kit with needle and twine
- Pencil
- Ruler
- Black yarn
- Glue
- Different colored dyes
- Gloves
- Sponges
- Plastic containers for mixing dye
- Plastic bag
- Hair dryer
How to Sew a Pillow Case – 3 Different Styles
These three different pillowcase styles will help spruce up your couch, bed, or loveseat while sticking to your decor budget.
1. Arch Balance Yarn Lines
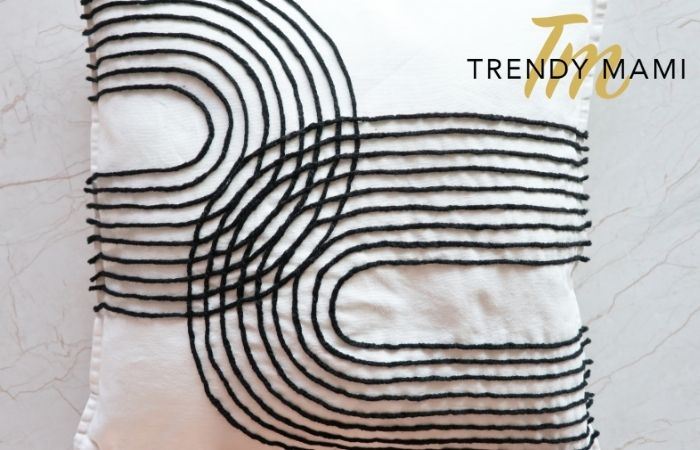
- Start by marking a blank pillow case 1.5 inches (3cm) from the bottom. Now make a second mark 12.2 inches (31cm) from the first mark. These are your two outer marks.
- Now make 8 more points in between each outer mark, approximately .6 inches (1.5cm) apart. This should give you a total of 16 marks.
- Using a ruler, draw a 9-inch (23cm) long line from each mark inwards towards the center of the pillow case.
- Now we will draw a perfect circle connecting the lines into arch shapes. With your threaded needle in hand, tie a pencil to the other end of the string.
- Stick the needle in the middle of the inner lines. Wrap the string around the pencil until you have a desired length to help you draw the arch.
- With the pencil, draw an arch starting with the two inner lines until each of the 8 lines is connected with the other.
- Repeat with the other side of the pillow making the 16 identical marks.
- These arches will be slightly shorter than the other side. With a ruler, draw lines approximately 4.5 inches (11.5cm) long.
- Draw the arches using your needle, thread, and pencil.
- Once the lines have been drawn, take your glue and trace over the lines.
- Place the yarn over the glue and cut the excess.
- With a needle and thread, stitch the yarn onto the pillow.
2. Mid-Century Modern Abstract
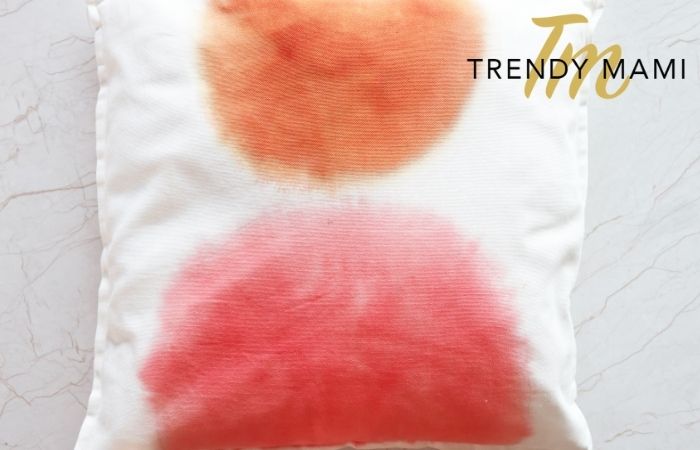
- With a pencil, draw two semicircles on opposite ends of the pillow case. One should be 13 inches wide (33cm) at its highest point, and the other should be slightly smaller at 10.2 inches wide (26cm).
- Mix your dye colors in a container (we created a salmon peach pink by mixing red and yellow and a camel brown by mixing brown and yellow).
- Place a plastic bag inside the middle of the pillow to prevent the dye from leaking through to the other side.
- Start by taking a wet sponge (dipped in water) and dampen the area that you want to color. Don’t go too close to the marked lines or else the dye with bleed past.
- Take another sponge and dip it in the dye. Lightly pat the dye onto the damp area inside the semicircle until it has been completely filled in.
- Repeat with the other color.
- Take a hair dryer and dry the dye to set the color.
3. Mid-Century Modern Art
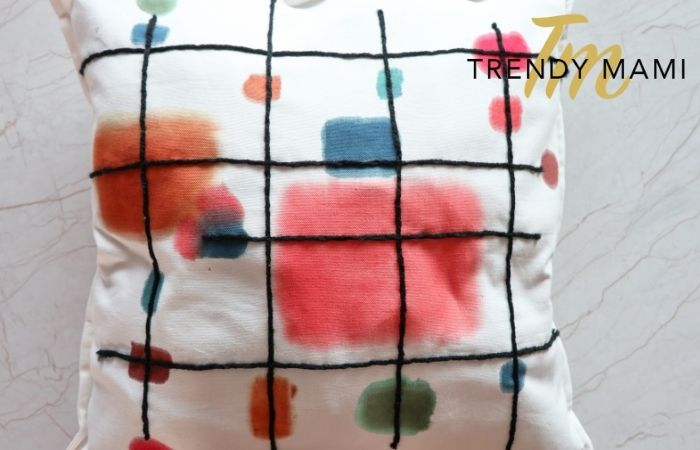
- On a pillow case, draw 4 vertical lines 4 inches (10cm) away from each other.
- Now make two horizontal marks 2.4 inches (6m) away from each other.
- Make 2 more horizontal lines approximately 4 inches (10cm) from the first horizontal lines.
- Mix and prepare your dye colors (we are using hot pink, peach pink, red, blue, camel brown, dark brown, and dark green).
- Place a plastic bag inside the middle of the pillow to prevent the dye from leaking through to the other side.
- Start by taking a wet sponge (dipped in water) and dampen the area that you want to color.
- Take the sponges and dip it in the different dyes. Make different square shapes in different sizes along the lines, experimenting with different color combinations.
- Make sure to blow dry each color after sponging on the dye to prevent it from bleeding.
- Take your yarn and glue it over the horizontal and vertical lines you’ve drawn.
- To reinforce the yarn, stitch it to the pillow case with a needle and thread.
More DIY Tutorials
See? Learning how to sew a pillow case with fun, abstract lines and colors is super easy. Plus, they’ll look great no matter where you place them in your home. If you’re feeling extra crafty, take a peek at our other DIY tutorials, including tie dye socks, flavorful lip scrubs, and giant chunky knit blankets.