We hope you love the products we recommend! Just so you know, Trendy Mami may collect a share of sales or other compensations from the links on this page.
–
DIY slime. It’s that kind of pastime that none of us—kids or adults alike—can explain our fascination with. All we know is whenever we’re around some, we can’t help but put it into our hands and play with it, seemingly for hours on end!
Sure slime is fun, but if your kids have been asking for some yet you can’t seem to rationalize actually spending money on any, first watch this video. It’s got some pretty insightful reasons behind the science of why slime is actually a good thing for your children to play with. Then, once it’s got you thinking “Oh wow” to yourself, go through your cabinets to find the ingredients in our DIY fluffy slime recipe.
Look at it as a stress releaser for you and a welcome surprise for your kids!
Fluffy Slime:
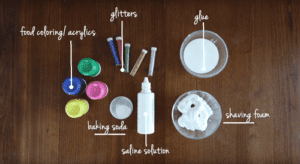
What you will need:
- ½ cup of glue
- ½ cup of shaving foam or bit more
- 1 teaspoon of saline solution (if you don’t want to use borax and water)
- 1 teaspoon of baking soda
- Food coloring or acrylics
You can find all these items at Target!
Step 1:
With a mixing bowl in hand, I first put the shaving foam and glue into the bowl and blend it together with a plastic/rubber whisk. (If you want to make more or less slime, just make sure that you have an even amount of glue and shaving foam at all times.)
Step 2:
Once both are well-blended, I then add a teaspoon of baking soda.
Step 3:
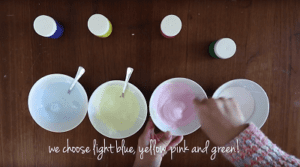
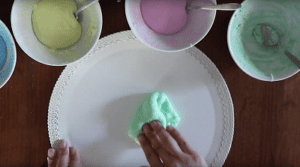
I typically like to make batches of slime in different colors in one sitting. So, I get out 3-5 different small bowls so that I can pour a little bit of the mixture into each one (you’ll see why in just a sec!).
Step 4:
Once some of the mixture is in each bowl (try and fill up at least one-half of each bowl), I then take my food coloring and pour a different color into each bowl (or I go back to kindergarten class and turn red and yellow into orange or yellow and blue and turn it into green, etc.).
Step 5:
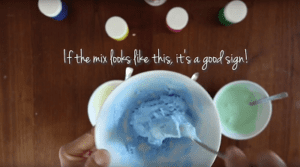
Next, I add in the saline solution. A little trial-and-error has taught me that it’s a good idea to look for the kind of solution that has borax in the list of ingredients; it will help create the best “slime consistency”.
Anyway, I use the whisk to blend everything together. Although I said a teaspoon of saline solution is fine, actually use the video as a better barometer (your slime should look like it does at the 1:00 mark).
Step 6:
I run my hands underneath some lukewarm water and gently knead the slime that’s in each bowl (separately, of course!). It looks and feels like slime at this point but when I want it to look fluffier, I put some more shaving cream on the slime while it’s in my hands (not a ton; just a little!).
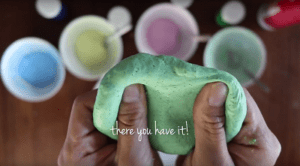
Then I keep kneading and stretching, stretching and kneading until it’s just the way I want my slime to be.
Helpful Tip #1:
If you want to add some glitter to your slime too, it needs to go into the mixture before you add the saline. Come to think of it, so does the food coloring!
Helpful Tip #2:
If you want your slime to be more “elastic-y”, add a little bit of body lotion (make sure it’s white so that it doesn’t change the color of your slime).
Fluffier Slime:
What you will need:
- 4 heaping tablespoons of cornstarch
- ½ cup of glue
- ½ cup of shaving foam or bit more
- 1 teaspoon of saline solution (if you don’t want to use borax and water)
- Food coloring
You can find all these items at Target!
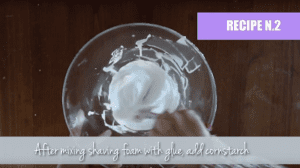
I pretty much do everything I did with the other recipe, only with a couple of twists.
Helpful Tip #1:
After mixing the shaving foam and glue, I add my cornstarch.
Helpful Tip #2:
With this recipe, it really doesn’t matter when I add the food coloring; it can be before or after putting the saline solution in.

Oh, a couple of more things—
If you’ve never made slime before, I can personally vouch for the fact that the first couple of batches may not turn out exactly as you would’ve hoped. Just stay patient with the process. By the third try, you’ll be a pro.
Also, if while you’re testing out my recipes and you’d prefer NOT to use glue, some DIY slime makers recommend using toothpaste and sugar or even shampoo and salt (with the shampoo and salt, you’ll need to keep the slime in the freezer for about 20 minutes once you’re finished making it).
I’ll just say that if you do this, you probably won’t get as much of a fluffy consistency, plus it probably won’t last as long; however, it is an option.
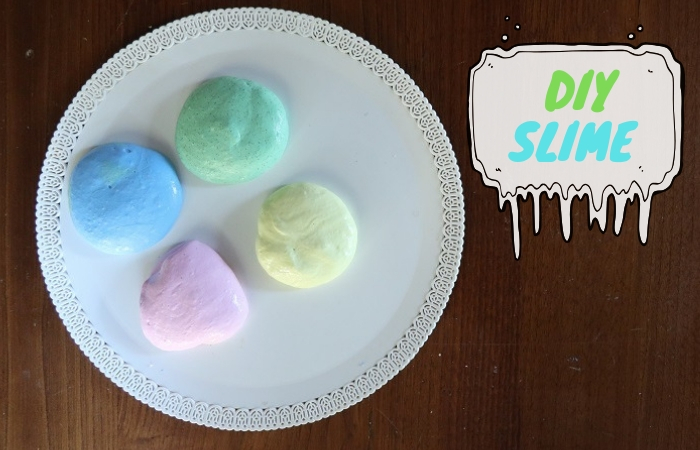
There you have it—some of the FLUFFIEST SLIME you’ll ever see in your entire life.
And you can proudly tell other moms that you made it all by yourself. Enjoy!
Need another DIY for your kids! Have you heard of felt food? Your kids will love it! Trust us! Go check it out and be the most creative parent on your block!