We hope you love the products we recommend! Just so you know, Trendy Mami may collect a share of sales or other compensations from the links on this page.
–
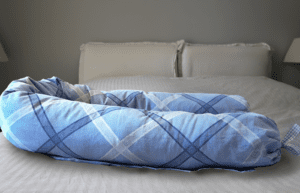
After part 1 of making the DIY pregnancy pillow, which hopefully kept you snug and comfortable, comes part 2: the baby lounger. Some of you may be reading this thinking “I barely have time to sleep, let alone make a new lounger!”
Once your baby is born, you have a lot on your hands, but 9 times out of 10, your hands are taken up by your little one. A baby lounger is the perfect solution to this problem, allowing both you and your baby to comfortably do your own thing.
As in part 1, this DIY project will be done with items you can find around the house. By recycling items, we’re saving money and being better for the environment.
Updating your kid’s wardrobes? Head here to find organic clothing for your child.
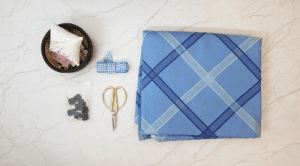
Materials Needed:
- A bedsheet
- Ribbon
- Buttons
- Scissors
- [easyazon_link identifier=”B011MKJEJE” locale=”US” tag=”twkmobile-20″]Padding sheet[/easyazon_link]
- Pregnancy pillow
So Let’s Get Started!
Step 1
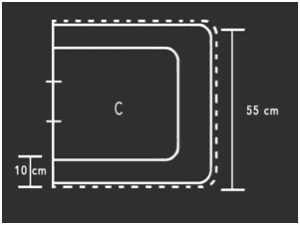
First, you will take the bedsheet and cut out the general shape from the pregnancy pillow, which will end up being a square-like shape, measuring around 55 by 55cm as shown below. Do this twice so that you have two pieces of diagram C.
The pattern of the bedsheet doesn’t make a difference in the outcome, but if you’re all about pictures like me, your bundle of joy will look extra cute in something stylish (and you’ll be able to say, “Thanks, I made it!” when your friends comment on your cute baby lounger). Also, if you didn’t know, babies register the color red before any others, so that could aid in picking colors for some of your baby items.
Step 2
Now that you’ve cut two pieces, sew two eyelets on each piece of diagram C (as shown in the photo) on what we will call the inner edge. Then draw a guide line along piece C 10cm away from the edge all the way around the dotted edges, which we’ll call the outer line.
Step 3
You will then need to cut another piece of fabric, which will be stripe D. Make this about 155-165 by 4cm.

Step 4
Once you have all the pieces cut, layer both pieces of C together with the rear side facing outwards.
Now, this may seem confusing at first, but bear with me here. Place stripe D between the two layers along the outer line so that the stripe is hanging over the edges. Sew all three layers together completely along the outer line.

Step 5
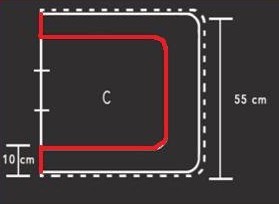
Reverse the fabric to the proper side, then iron and pin it to keep it even for the next step. Just remember to be careful and not prick your fingers as I usually do.
Now sew along the inner line (where you drew the guide line), and partially along the inner line, but only 10cm in on either side.
It should be like this:
Need more help with this part of the baby lounger, check out the video here!
Step 6
Once you have it sewn together, the next step is to place the padding in the opening of the fabric. If you do not have padding sheets, you could switch it out for any similar fabric/blanket, pillow filling, etc.
Position the padding/blanket so that it creates a comfortable mattress for your baby, of course, because you wouldn’t want an awkward, stiff lump under your rear.
Then, take two strips of ribbon through the eyelets to tie the opening shut.

Step 7
Take your pregnancy pillow made in part 1 and set it along the outside edge (on stripe D). Mark stripe D where each of the eyelets of the pillow are. Now, place a button on each marked area and sew them on.
Step 8
The last step is simply to put the buttons through each eyelet, connecting the pillow to the mattress.
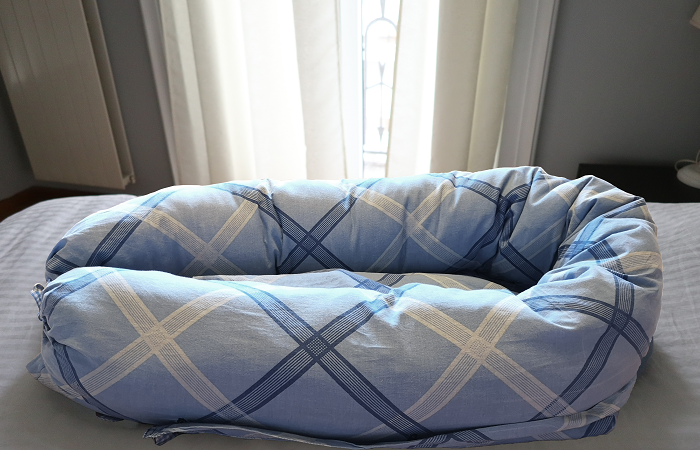
You have now completed an easy and inexpensive baby lounger that your little one and you will both be grateful for! Don’t spend $80 on a basic item that you’ll only use for number of months. Instead, repurpose old items and give your beloved child a cozy place to hang out while you’re busy with laundry or dishes, or just have tired arms. Always remember though, that a baby lounger is not a baby bed – suffocation risks are not worth it.
Loved part 1 and part 2 of this DIY but just can’t find the time to make them both? Or even one of them? Still want to get ready for your quickly approaching newborn?