We hope you love the products we recommend! Just so you know, Trendy Mami may collect a share of sales or other compensations from the links on this page.
–
Whether you and the kids want to create a show-stopping entrance to your humble abode with your Halloween decorations or are just looking for some fun Halloween DIY crafts to keep you and the little ones entertained, these Halloween DIY activities are perfect! Get your little pumpkins in the Halloween spirit this year, not to mention keep them busy for a couple of hours, with these easy Halloween DIY crafts for kids. Check out our tutorial for these festive Halloween DIY crafts for kids below! When you’re done with this one, keep up for craft momentum to start on 5 DIY Halloween Lantern Decorations or Unbeatable DIY ‘Stranger Things’ Halloween Costumes – Video Included.
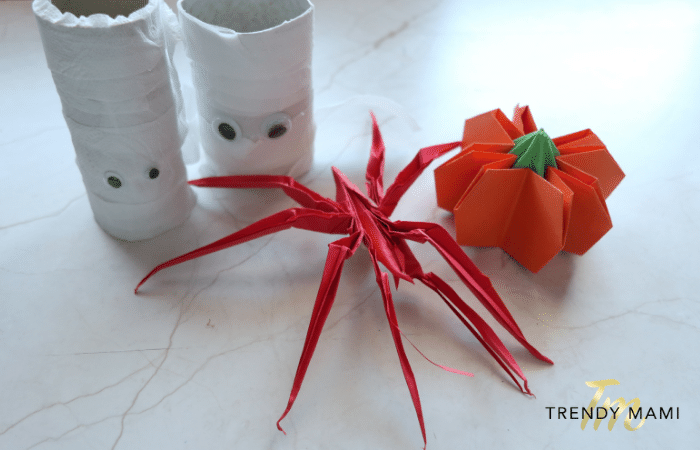
Halloween DIY For Kids
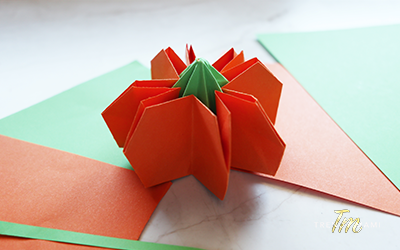
1. Pumpkin Origami
 Materials:
- [easyazon_link identifier=”B06XW45PMR” locale=”US” nw=”y” tag=”twkmobile-20″]Origami paper[/easyazon_link] (20x20cm orange paper and 11×11 cm green paper)
- [easyazon_link identifier=”B073K2NGY2″ locale=”US” nw=”y” tag=”twkmobile-20″]Glue stick[/easyazon_link]
Instructions:
Step 1. Take a square sheet of orange paper and fold it along the diagonals and unfold. However, if you are using origami paper, place the white-side facing up.
Step 2. Turn the paper over.
Step 3. Fold the paper in half (left to right) and unfold.
Step 4. Fold the paper in half (top to bottom) and unfold.
Step 5. Take your green square of paper and glue it in the center of your creased orange paper.
Step 6. Fold your paper in half (your green paper should be hidden in the center).
Step 7. Proceed to fold into a kite shape, demonstrated in our video tutorial at 0:36.
Step 8. Unfold your kite shape and proceed to reverse fold.
Step 9. Take your kite shape and proceed to fold down the top edges and unfold (as shown in our video tutorial at 2:23 – 2:41).
Step 10. Proceed to reverse fold.
Step 11. Take your cone shape (as shown in our video tutorial at 3:31) and fold in half (bottom to top).
Step 12. Unfold and refold creases on the outside, emphasizing the folds on the outside.
Step 13. Proceed to pinch and fold your shape inwards, creating your pumpkin shape. For a more precise fold, pay attention to the bottom of your origami shape.
Step 14. Proceed to do a valley fold on all of your flaps (as shown in our video tutorial at 4:50).
Step 15. Enjoy your pumpkin origami Halloween DIY décor!
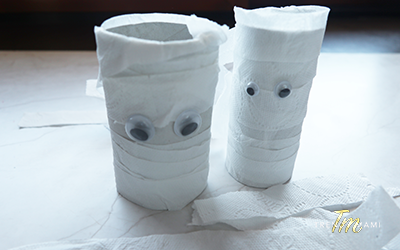
2. Mummy Roll Paper
 Materials:
- [easyazon_link identifier=”B07FGBSF45″ locale=”US” nw=”y” tag=”twkmobile-20″]Toilet paper[/easyazon_link]
- Toilet roll
- Googly eyes
- Scissors
- Glue stick
Instructions:
Step 1. Use your scissors to cut the toilet paper into strips approx. half an inch wide.
Step 2. Then, use your glue stick to glue the strips of toilet paper onto the empty toilet paper roll. Be sure to wrap the toilet paper around the toilet roll like a mummy.
Step 3. Be sure to leave a small empty area in the middle of the toilet roll so that you can later place the googly eye stickers.
Step 4. Proceed to stick your googly eyes on your toilet roll, in the space we left in the middle earlier.
Step 5. Enjoy your mummy Halloween DIY décor, made of toilet paper and other items found in your home!
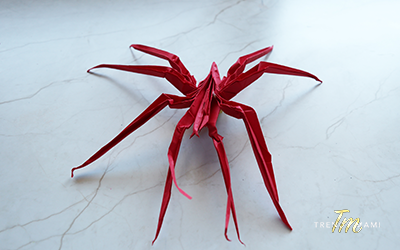
3. Spider Origami
 Materials:
Origami paper (red)
Box cutter
Scissors
Instructions:
Step 1. Take a square sheet of red paper and fold it along the diagonals and unfold. However, if you are using origami paper, place the white-side facing up.
Step 2. Turn the paper over.
Step 3. Fold the paper in half (left to right) and unfold.
Step 4. Fold the paper in half (top to bottom) and unfold.
Step 5. Proceed to fold into a kite shape, demonstrated in our video tutorial at 7:57.
Step 6. Unfold your kite shape.
Step 7. Take your box cutter and proceed to cut to the points shown in our video tutorial at 9:00 – 9:30.
Step 8. Proceed to fold your paper into a 4-point star shape (as shown in our video tutorial at 9:31 – 9:44).
Step 9. Fold your 4-point star shape in half (from bottom to top). Unfold.
Step 10. Proceed to fold into a kite shape again.
Step 11. Proceed to fold into a smaller kite shape (as shown in our video tutorial at 10:09– 10:45).
Step 12. Unfold and reverse fold.
Step 13. Proceed to make the folds demonstrated in our video tutorial at 11:51 – 13:57.
Step 14. Take your scissors and cut to the cross point (as shown in our video tutorial at 13:59).
Step 15. Proceed to make the folds demonstrated in our video tutorial at 14:05 – 14:55.
Step 16. Open and use your scissors to cut as we did with the previous side.
Step 17. Now fold them all as the first example.
Step 18. Proceed to fold and flatten the areas of your origami shape (as shown in our video tutorial at 16:35).
Step 19. Fold at the angles shown in our video tutorial at 16:54.
Step 20. Repeat with the other back legs.
Step 21. Cut the 2 centered legs in half to create the palps.
Step 22. Proceed to fold your origami spider legs (as shown in our video tutorial at 17:59 – 19:00).
Step 23. Proceed to cut the 2 back centered legs and fold accordingly.
Step 24. Enjoy your creepy crawly origami Halloween DIY décor!
We hope you enjoyed this article on our Halloween DIY crafts for kids, full of creepy crawlies, cute pumpkins and spooky mummies! If you’re looking for more spooktastic kid-friendly activities for Halloween, check out our Spooktacular Halloween Activities for the Whole Family. Why not enjoy baking some Halloween treats with the kids? Check out our Halloween Cookies recipe! If you exhausted these DIY ideas, order a baking or craft box from Cratejoy!