We hope you love the products we recommend! Just so you know, Trendy Mami may collect a share of sales or other compensations from the links on this page.
–
With Halloween just around the corner, these voodoo doll keychains are a simple and fun way to get into the festive fall spirit. They’re the perfect DIY to make with your little ones, although crafters of all ages can enjoy making these. Also, we think they make perfect gifts for any loved ones celebrating something special in the fall.
Here are our instructions for making voodoo doll keychains!
Materials for Making a Voodoo Doll Keychain:
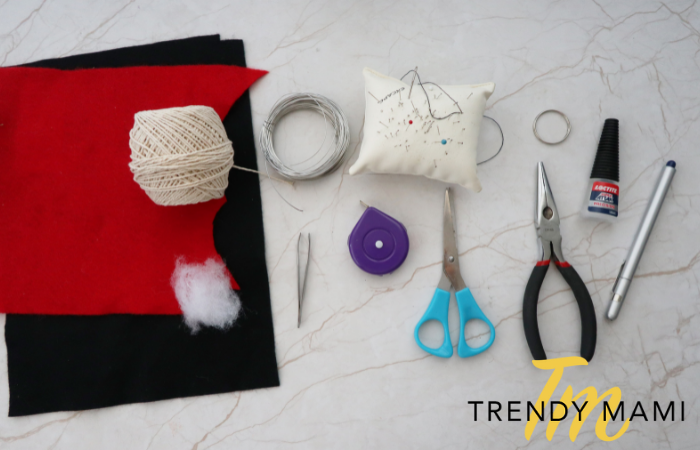
- Twine or yarn
- Wire
- Needles/pins
- Keyring
- Glue
- Scissors
- Padding
- Black felt
- Red felt
- Tweezers (optional)
It’s easy to find most of these materials at your local Target! While you’re there, shop their grocery items to pick up tasty ingredients for some Halloween cookies to snack on.
Instructions for Your Voodoo Key Chain:
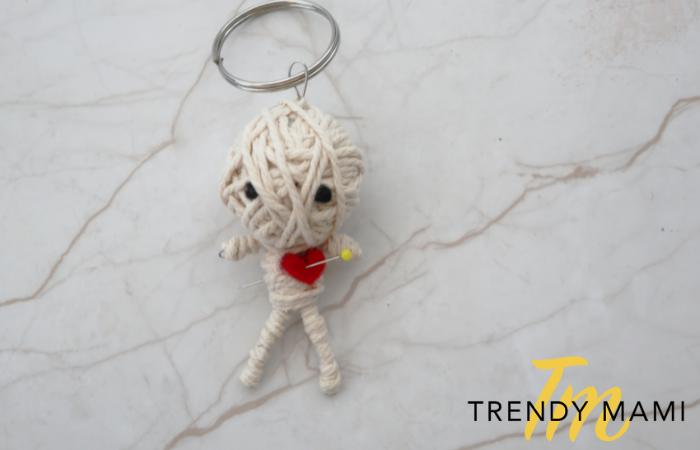
- For our voodoo doll keychain, we’ll need to cut about 20 inches (50cm) of wire.
- Taking one end of the wire, measure out 3 inches (8cm). Fold the wire at the 3-inch mark to make a small loop that will hold the keyring.
- Twist the wire together after the loop all the way down, creating a second “leg.” The other “leg” is the cut end of the wire.
- Twist the wire around each leg to give it more durability. The pliers can be used to help make the shape of the body and legs.
- After the legs are formed, you can twist the wire back to the middle around the “torso.”
- From here, continue folding the wire to create two “arms.” Twist the wire around each of the arms, like you did the legs.
- You should now have a full-body skeleton (or a star shape) for your voodoo key chain. Now, clip off any excess wire if you have it.
The Padding
- Now we will need the padding to give our voodoo doll skeleton more of a human shape. First, add a bit of padding to the head portion of the wire, leaving the loop-free.
- Wrap the yarn or twine around the padding of the head until it’s completely covered. But make sure to leave the loop coming out of the head. Then, you can also glue the twine onto the padding or wire and change directions.
- After the head is wrapped, then start to wrap the twine around the torso and the arms. Cover the wire completely.
- Wrap the bottom part of the skeleton and the two legs. Additionally, we recommend adding a few extra layers to the torso to give him a thicker shape.
- Once your doll is wrapped in twine, then you can cut the string and glue the end to the back of the body.
- For the eyes, cut two small pieces of black felt and roll the felt between your fingers to make them into round balls.
- Dab a drop of glue on the face where the eyes should be, and if you have tweezers, use them to help you set the felt onto the glue.
- Now, cut out a small heart shape from the red felt. After that, dab a drop of glue on the doll’s chest and place the heart on top.
- If you have a thumbtack pin or marker, you can stick that into the heart for a more realistic voodoo look.
- Now, open the keyring and pass it through the loop on top of the head. That’s it! You now have your very own spooky (and adorable) voodoo doll keychain!
More Halloween Crafts
While voodoo dolls are meant to be scary, these little keychains are anything but! If you’re looking for more Halloween inspiration, check out our tutorial for making delicious Halloween cookies or colorful Halloween lanterns. And if you’re throwing a festive party this fall, check out the best places where to buy your next Halloween costume!