We hope you love the products we recommend! Just so you know, Trendy Mami may collect a share of sales or other compensations from the links on this page.
–
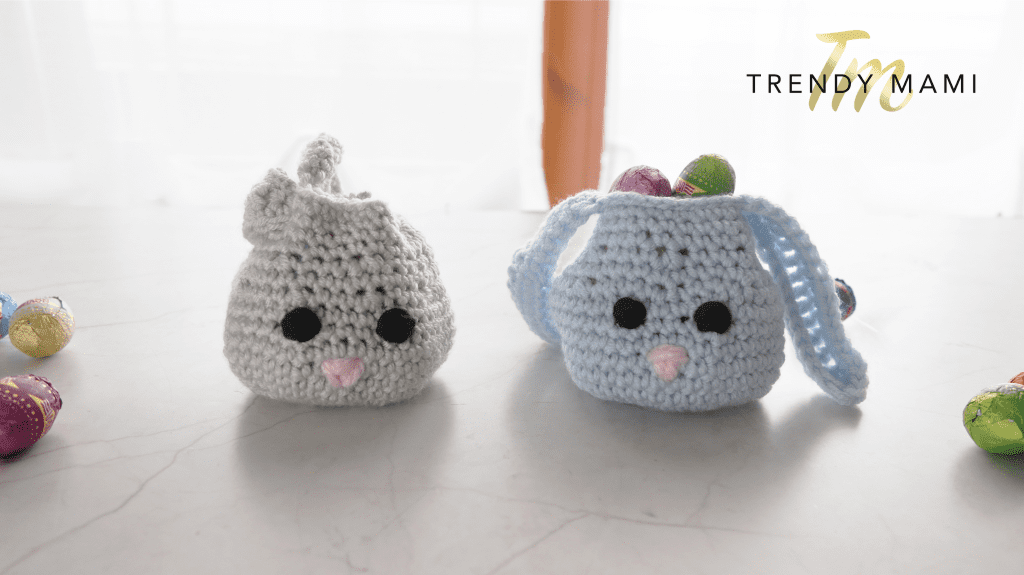
Easter is a time for celebration, and one of the most beloved traditions is the Easter basket. Filled with colorful eggs, candy, and other goodies, Easter baskets symbolize new beginnings and the joy of spring. Making your own Easter baskets is a fun and rewarding activity, especially when paired with making crochet bunnies.
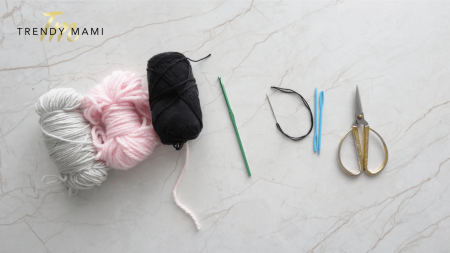
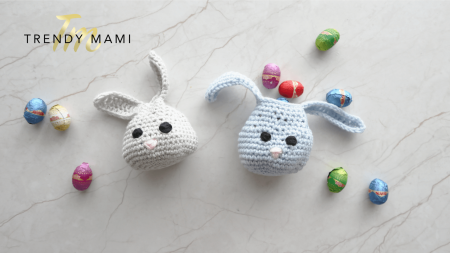
A crochet bunny will add a touch of whimsy to your basket and will also make a treasured keepsake for years to come. Today, we’ll guide you through how to make your own crochet bunny and give you some ideas for how to fill your DIY Easter baskets. So, grab your crochet hook and your yarn, watch our how-to video, and get started on this fun and creative candy Easter basket. Whether you’re making adult Easter baskets or Easter baskets for kids, they’re sure to please!
How to Make DIY Easter Baskets
Step 1: How to Make a Crochet Easter Bunny
We recommend you follow along with our video, but we’ve detailed all the steps below to ensure everything is as straightforward as possible. Please keep reading for our favorite DIY Easter basket ideas!
- With your crochet hook and yarn in hand (you can use any color you like, though pastels are popular for Easter), start with a magic ring and make 10 single crochet, then pull tight.
- Join the last single crochet with the first with a slip stitch.
- For your first chain, do 2 single crochet on each stitch with 2 single crochet on the last two stitches, finishing with a slip stitch. Do this for 2 rounds for a total of 18 stitches.
- Complete 3 further rounds so that round 3 has 24 total stitches, round 4 has 32 total stitches, and row 5 has 42 total stitches.
- For rounds 6 through 11, complete a further 42 total single crochets, finishing with a slip stitch and an invisible stitch.
- For round 12, we’ll be decreasing by 8. Complete a crochet decrease (taking 2 stitches in 1), followed by 3 single crochet, a crochet decrease, and 3 single crochet, until you complete the round for a total of 34 stitches.
- Round 13: 33 single crochets followed by a slip stitch and an invisible stitch. Repeat for round 14.
- For round 15, we’ll be decreasing by 6. Again, complete a crochet decrease (taking 2 stitches in 1), followed by 3 single crochets, a crochet decrease, and 3 single crochets, and repeat until you complete the round for a total of 28 stitches.
- Round 16: complete 27 single crochets followed by a slip stitch and an invisible stitch.
The Bunny Ears
- Next, we’ll be working on one of the ears. Chain 17, double crochet on the 4th chain, double chain the next 7, then half double crochet stitch to the remaining chains (6 chains). Skip 3 stitches on the round and join the end of the ear with a single crochet. Then single crochet the next 10.
- For the other ear, chain 17, double crochet on the 4th chain, double chain the next 7, then half double crochet stitch the next 6. Use a single stitch to reconnect.
- For the final round, single crochet for each stitch that you have a half double crochet stitch. Then half double crochet stitch to the stitches with double crochet.
- At the top of the ear, do 4 double crochet on the loop. Slip stitch around the brim until you get to the next ear and repeat the same for the other ear.
- To finish off your bunny by giving it some eyes and a nose. Grab some pink yarn and find the middle, between the ears. Count from the first round to the 7th and thread the needle in.
- Let the needle out from the left stitch and then point into the first spot to create a diagonal line. Repeat to the right to create the sides of the triangle.
- Go back to the top left point and reconnect to the left to close the triangle. You can continue to fill the gaps.
- For the eyes, take a few stitches away from the nose, making sure to follow the diagonal line of the nose and thread from left to right by moving the yarn as you go around the line to create the circle shape of the eye.
- Repeat for the other eye.
- Done! Add your bunny to your basket.
Step 2: Fill Your Homemade Easter Baskets with Goodies
Now you’ve got your bunny, you can find a suitably sized basket for the size of the gift you want to give, and then fill it with other goodies. If you need some inspiration for your basket:
- These personalized baskets on Etsy are ideal for giving out to your kids full of goodies or for their Easter egg hunt
- For little kids, Target has this adorable White Bunny Basket with plush handles.
- For a more traditional wooden basket, this colorful oval woodchip Easter basket from Walmart is an affordable option that can easily be repurposed later to hold toys.
For Things to Put Inside Your Basket:
- Chocolate! No Easter basket would be complete without chocolate bunnies and eggs (unless, of course, they have to hunt for them!). Lindt Gold Bunnies are a classic, and especially appreciated by the adults in your life. Hershey’s also does a solid chocolate bunny, as does Frankford. Frankford foiled eggs are a classic, and Cadbury Cream Eggs are an addictive twist on the classic chocolate egg.
- Snacks, such as popcorn, trail mix, and fruit snacks. Baking cookies or cupcakes is another great idea for homemade Easter baskets.
- Small toys, such as puzzles, stuffed animals, or figurines. You can customize this for the recipient, depending on their gender, age, and likes and dislikes.
- Arts and craft supplies, such as coloring books, crayons, markers, embroidery kits, and so on.
- Personalized items, such as monogrammed keychains or water bottles.
- Books, whether that be a picture book or a novel, that you want to recommend to them.
- Spring-themed accessories, such as sunglasses, hats, and jewelry.
- Seeds for planting for summer.
- Gift cards for their favorite stores, cafes, or restaurants.
- Bath products, such as bath bombs, soaps, and lotions. (Why not make your own bath bombs for your DIY Easter baskets since you’re feeling crafty?)
More Easter Fun
We hope you liked our adorable Easter basket ideas for kids! Remember to be creative and have fun while you put together your homemade Easter basket, knowing it will bring a big smile to someone’s face! You’re ready to start filling these Easter basket alternatives with Easter grass, jelly beans, and other delicious treats.
While you’re embracing the Easter spirit, make sure you check out our Easter bread recipe including colored eggs, Easter egg design ideas, easy DIY Easter Decorations, and our list of fun Easter activities for the whole family at home.